1965 Rear Bumper to Body Seal Installation?

The Era of The Square Body Racing Comets
User avatar
kevinshi
Posts: 249
Joined: Thu Jul 17, 2014 1:56 am
Location: Bellevue, WA

1965 Rear Bumper to Body Seal Installation?

Post by kevinshi »

I am trying to sort exactly how to install the Rear Bumper to Body Seal (aka Stone Defector, aka Gasket, aka C5GY-17808, aka (sort of) C4DZ-17808-A).

It would be super helpful to see a picture if anyone has a good photo of a final/correct (or factory) install.

I have read through a bunch of posts in the forum... and done a bunch of research on my own... and unfortunately my car did not have one of these installed for me to use as a guide.

I have questions about Orientation, Fasteners, Adhesive and finally Trimming (Length):

Orientation:
In GeneB's how to install body to bumper seal on 63 Comet, poboyjo65 comments "...the groove that is on top...goes on the flange of the car." Meanwhile the MPC illustrations clearly indicate that the upper side is textured - which implies a specific orientation. [Edit: Later in this thread I post images of the MPC illustrations which seem to imply an orientation that is consistent with my picture.]

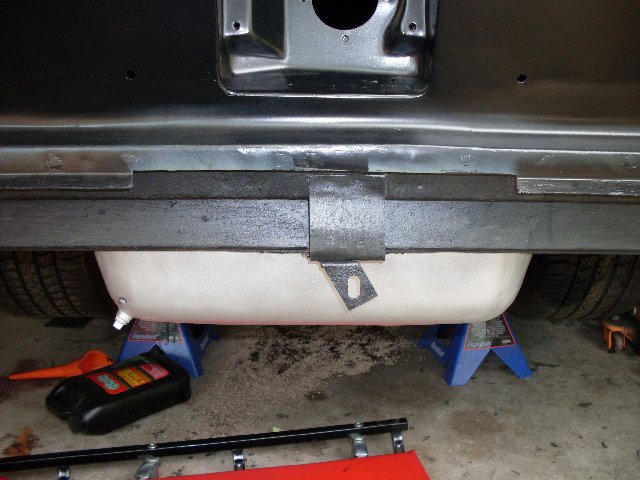
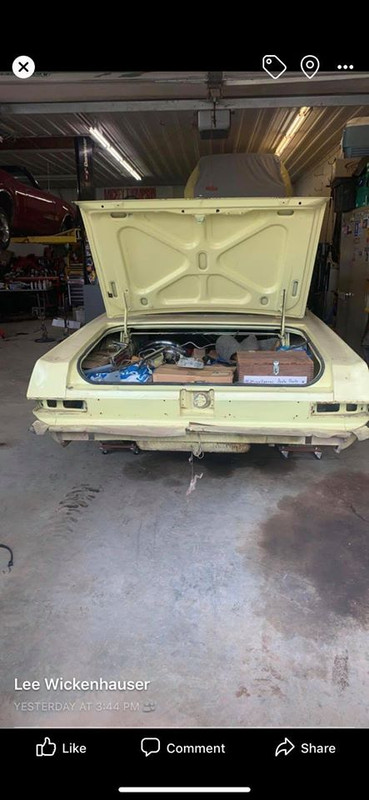
Question 1: Is the below picture correct?

Image

Fasteners:
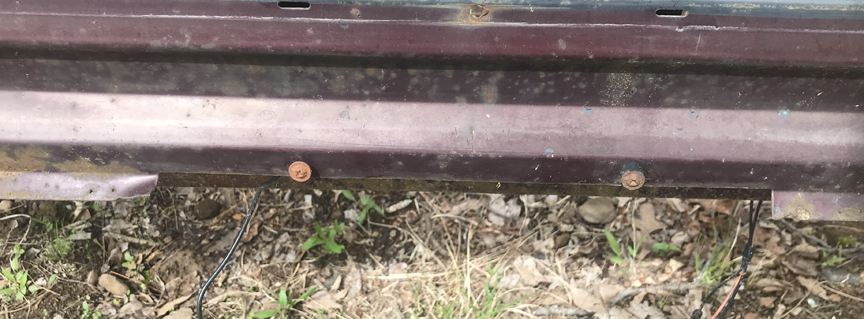
In Goover's Rear Bumper Gasket??, Lou Ripper's WTH? and albert's Ford Metuchen NJ building 65 Comets there is discussion of installing staples. My car's flange has holes for staples (good) and my repop part included staples (good)... however it also includes two self tapping sheet metal screws.

Question 2: Where do the two screws go?

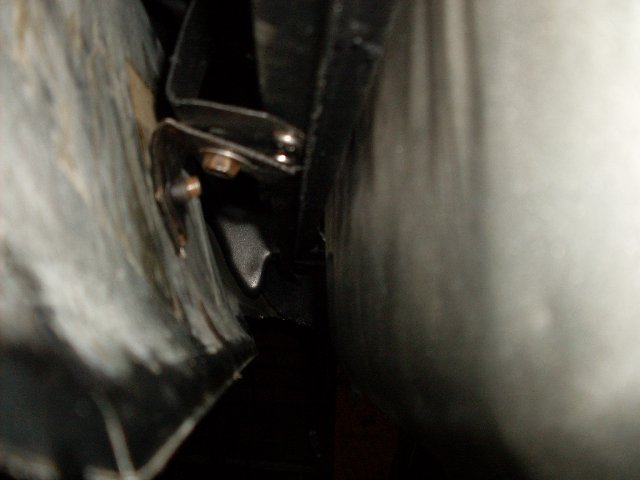
At first I thought perhaps the seal wraps around the corner to the screw hole on the side of the quarter panel (as seen in the above picture - upper right). However, if my orientation is correct (ahem) then the hole around the side is a goofy candidate because the seal does not wrap nicely around that corner and up to that screw hole. Furthermore I think those holes serve some other purpose that I will later discover (or one of you will remind me now ;-)).

Meanwhile the Comet MPC nor Shop Manual give any guidance... however the Falcon MPC illustration does show two screws in the middle (though that illustration also seems pretty error filled - it indicates that both the flange and seal have a raised ridge at the middle (above license plate) rather than the seemingly correct 'straight through'). [Edit: Per my below comments, I later discovered that indeed (much to my surprise) the Falcon and Comet have different "Lower Back Panel" sheet metal body parts.]

If indeed the screws are supposed to go through the holes in the middle (per below picture's penciled red arrows) then the choice of a self tapping screw seems super strange because that would mean the screw would pierce the sheet metal *before* then screwing into the rubber... which isn't going to hold very securely. Surely they didn't screw in from the backside - that would be nearly impossible reach, not to mention the sharp ends of the screws would be pointing outward.

Image

Adhesive:
As far as I can tell, none of the threads here in the forum discuss whether or not weatherstrip adhesive was used.

Question 3: Is there supposed to be weatherstrip adhesive along the flange?

Trimming (Length?):
In Groover's Rear Bumper Gasket?? thread, albert advises "Make sure you try to keep your old [seal] in good shape when you remove it, you will need to use it as a guide on where to make the cuts." (My car did not have a seal here when I took delivery years ago).

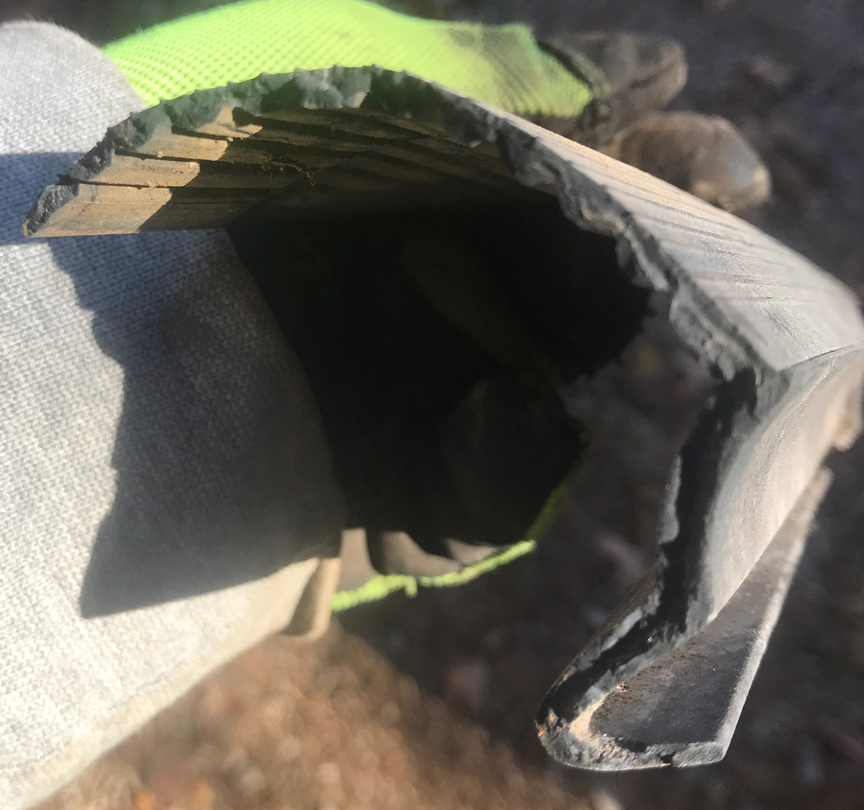
The Comet MPC describes C5GY-17808-A as "67-3/4" long" whereas the Falcon MPC describes C4DZ-17808-A as "Rubber - 73 1/2" long." The repop C4DZ-17808-A I received (Dennis Carpenter) is 72 1/4" on the long edge and 68 1/4" on the short edge. Meanwhile the (gapped) flange on my car is 59" wide (total). If I was to keep the same trim angle as the repop and then cut the short (upper) edge to 59" the long (lower edge) would end up 63."

None of these dimensions seem to match up. And the relatively narrow 59" wide flange on my car implies that either (a) the seal was indeed suppose to wrap around the corners of the car or (b) the seal is supposed to be trimmed (seemingly as per albert's comment).

Question 4: How long is the seal suppose to be? ... and if the answer is greater than 59" on the short edge then how is installation achieved on the corners?

[Edit: Per my below comment, I later discovered in 1962comet's Help Identify These Parts thread, that mercurycyclone comments the following regarding this part for 1962 & 1963 Comet 2 & 4 door sedans and 63 Convertible: "..the parts book says it is 78" long "cut to fit"." I conclude that the same must be true for the 1965 parts - and for whatever reason the 1965 parts books just omitted the "cut to fit" part. Obviously the question still remains as to what length they are supposed to be trimmed (again, do they wrap around the corners or stop at the vertical body seals?).

Thanks,
kevin
Last edited by kevinshi on Wed Apr 22, 2020 12:33 pm, edited 2 times in total.
Thanks,
kevin
1965 Caliente Convertible
5H25A525287 (76DM6204L5416)

User avatar
poboyjo65
Moderator
Posts: 7059
Joined: Thu Oct 20, 2011 9:40 pm
Location: Camden, Tenn.

Re: 1965 Rear Bumper to Body Seal Installation?

Post by poboyjo65 »

I think you have it upside down. I just went out to look at mine,well you cant see it but I stuck a finger in above the tag & could feel that the ridges were pointing down,opposite of how you have it. I think it gets screws in the holes around the corners & in the center. but who knows? my car had bits & pieces of the seal still on it but I cant find any pics. the idea is for the flap to hold tight to the bumper to keep dust & debris from coming up between there. I did find a pic of my parts car that has a piece of it still screwed to the corner,though it has spun pointing up& down;
Image
Image
I think when I did mine I just found the center of the seal & screwed it to the holes in the center then worked my way to each end & left all of the extra on the ends to help keep the dust from the corners. I think I test fitted the bumper before I put all of the fasteners in. the hump in the center of the bumper comes to mind for more troublesome than the corners because of the tag light & its wire ,,,but it has been a few years since then so it's foggy. I may have used a little weather strip adhesive on the corners to make it do right around the screws.
Image
Johno

User avatar
poboyjo65
Moderator
Posts: 7059
Joined: Thu Oct 20, 2011 9:40 pm
Location: Camden, Tenn.

Re: 1965 Rear Bumper to Body Seal Installation?

Post by poboyjo65 »

Here is a good pic of the 2 center screws, you can also see the ridges turned down if you look close. the 2 upper screws on the bumper are for the tag light barely peaking around the bumper in the middle. falcon bumpers dont wrap around,& I'm guessing that's why you only got 2 screws
Image
Image
Johno

User avatar
kevinshi
Posts: 249
Joined: Thu Jul 17, 2014 1:56 am
Location: Bellevue, WA

Re: 1965 Rear Bumper to Body Seal Installation?

Post by kevinshi »

Super helpful, many thanks.
"I did find a pic of my parts car that has a piece of it still screwed to the corner,though it has spun pointing up& down."
Your two parts car pictures clearly show a rubber bit hanging out around the corner... which seems to hopelessly disprove what I say below...
...falcon bumpers don't wrap around,& I'm guessing that's why you only got 2 screws...
Super logical theory. I now wonder whether those two screws simply weren't used on the Comet (or at least they were not intended to be used by the Engineering and Design team).
I think you have it upside down... here is a good pic of the 2 center screws, you can also see the ridges turned down if you look close...
The photo evidence you supply supports what you are saying... however the Master Parts Catalogs illustrations seem to disagree (see below).

Note: When you click on the below image a larger version will appear... but if you click the larger image it will open an even LARGER one. So CLICK TWICE! ;-)

Here is the illustration from the 1965 Comet MPC:
Image

To me that picture (strongly) implies (1) that the shorter edge is suppose to be on the top, (2) the thick/puffy part of the rubber was suppose to be above the thinner "grill" area, (3) the "grill" area was suppose to face away from the body of the car and (4) the rubber was cut to fit inside the vertical body seam which is inside the outer edge of the tail light.

Here is the illustration from the 1965 Falcon MPC:
Image

This picture supports that the shorter edge is suppose to be on top. While less convincing, it also somewhat supports that the puffy part was supposed to be above the grill (the top edge of the illustration there is a bit bolder). Finally it supports that the "grill" area was suppose to be facing away from the car. This illustration is unhelpful with regards to width (but that isn't surprising since, as you point out, the Falcon bumper didn't wrap around the car as much as the Comet's).

On the Falcon illustration you can see two 350745-S screws in the middle. However, as I mentioned previously, it is interesting that the flange is shown as having a raised area in the middle where the the seal conformed. I just looked it up and this for this "Lower Back Panel" the Falcons did indeed have a C4DZ part whereas the Comets had a C5GY number. Dang, it seems they really are different.

Finally, here is the illustration from the Shop Manual:
Image

This is the strongest evidence yet that the shorter edge is suppose to be on the top. Obviously this is the Falcon (not the Comet - despite the caption otherwise...) however its useful to see that the rubber is narrower than the car itself. Per my previous comments, the Falcon MPC called for "Rubber - 73 1/2" long" which much wider than this illustration implies. So in this respect the two MPCs are consistent (they both call for a longer part than the illustration implies). I do not have a theory as to why this is...
...the idea is for the flap to hold tight to the bumper to keep dust & debris from coming up between there.
Agreed. In that sense it seems to me that this rubber part serves the same function as accomplished on the front by the valance. E.g. the front had a metal stone deflector (aka valance) whereas the back had a rubber stone deflector (aka seal or gasket).

I would think that this purpose would be better achieved by installing it as these illustrations imply (and as I pictured it in my previous post). This would, I think, cause the rubber to jut out/down and protrude under the upper lip of the bumper.

In your installation does the rubber reach up and then seal off against the bumper? If so I'm guessing you had to "tuck" it under from above to keep it from jutting out/up/over the bumper?

Regarding trimming to length, in 1962comet's Help Identify These Parts thread, mercurycyclone comments the following regarding this part for 1962 & 1963 Comet 2 & 4 door sedans and 63 Convertible: "..the parts book says it is 78" long "cut to fit"." I conclude that the same must be true for the 1965 parts - and for whatever reason the 1965 parts books just omitted the "cut to fit" part. Obviously the question still remains as to what length they are supposed to be trimmed (again, do they wrap around the corners or stop at the vertical body seals?).

In his Ford Metuchen NJ building 65 Comets post, albert talks about the line worker saying this part was difficult to install. I wonder whether engineering (and/or illustration) and the line were not on the same page. The two corner screw holes on my car seem like they are a "hack" - they seem to have been just punched through (it's dented and there is shrapnel on the interior side). Whereas the two center screw holes are clearly by design - there is a recess behind them (almost like a u-nut was suppose to be installed) and they are cleanly drilled holes. However, per my above comments, I wonder whether on the Comet those two holes are there for some other purpose - maybe as a place to hang a license plate if the car had no bumper or something...

Perhaps the Parts department designed a seal that, per the Engineering Department, was designed to be "cut to fit" by the Line workers. But the message to cut this didn't make it to the line... so the line ends up with this part that seems like it should wrap around the corners. Meanwhile those dang staples are a pain in the butt to install. So the line improvises - they zing in a couple of screws on the corners... which helps the seal wrap the corner and holds it in place for the staples. Meanwhile the two holes in the middle are there for some other purpose... that's a theory anyway...
Thanks,
kevin
1965 Caliente Convertible
5H25A525287 (76DM6204L5416)

User avatar
kevinshi
Posts: 249
Joined: Thu Jul 17, 2014 1:56 am
Location: Bellevue, WA

Re: 1965 Rear Bumper to Body Seal Installation?

Post by kevinshi »

Just stumbled across this picture from a ebay listing for parts off a 1964 Comet.

Image

I just messaged the seller to ask if they would kindly send me a closeup picture of how the seal is attached to the car.

Failing a better view, I think this one was installed as poboyjo65 has advised (and therefore contrary to my theory of what the MPC instructed). E.g. it looks to me like the seal is flopping over from having been installed upwards... and the bulk of the seal appears to have been attached such that it is above the flange (vs my theory where the bulk should be installed below the flange).

Of course no way of knowing for certain this seal was attached by the factory (though it seems pretty likely).
Thanks,
kevin
1965 Caliente Convertible
5H25A525287 (76DM6204L5416)

User avatar
poboyjo65
Moderator
Posts: 7059
Joined: Thu Oct 20, 2011 9:40 pm
Location: Camden, Tenn.

Re: 1965 Rear Bumper to Body Seal Installation?

Post by poboyjo65 »

It does look like it is different than mine in the books.model years may be different .& the original seals may have been made different. One on a 64 in a pic I have looks like it stuck up above the bumper ,in plain view.It could have had the bumper off at some point & didnt get the seal flapped back right. lots of thing could have happened in 55 years. Roy said his car didn't ever have one. They weren't gonna let it stop progress even if they ran out of seals.
I had it mocked up first like in your pics shows ,but it didn't seem right.like it was just hanging straight down not doing anything. I looked on here & saw conflicting reports,kinda like you're doing ,but when it came down to doing it,,,it just seemed like it fit better & it flopped up over the tag light better & not blocking the light from the tag & would have needed trimmed around the tag light the other way .
Image
as for the ends I wanted to leave all I could to keep my lights from getting dusty. I think I did make some relief cuts but I believe I cut a sliver out of the lower part & left the part that blocks the dust.
here is a few pics I found, the yellow 65 looks like mine,the black 64 looks like it got flopped straight up at some point;
Image
Image
Image
Image[/ur]
[url=https://postimages.org/]Image
Last edited by poboyjo65 on Sat Apr 25, 2020 1:44 am, edited 1 time in total.
Image
Johno

lavron
Site Admin
Posts: 4710
Joined: Sat Nov 01, 2003 9:17 am
Location: Missouri, Ozarks
Contact:

Re: 1965 Rear Bumper to Body Seal Installation?

Post by lavron »

I think my '64 looked like the black '64 it poked out not down. Now I wish I had taken pictures before I took it off.

I think I agree they may have been different between the years and even depending on where the car was built, like Roy said his' never had one.

I think in any case, even a show car would never be marked down for the position or the lack of one because no one knows for sure how they were mounted.

See Ya,
Mike
Mike's build thread
viewtopic.php?f=9&t=13058
Image

User avatar
kevinshi
Posts: 249
Joined: Thu Jul 17, 2014 1:56 am
Location: Bellevue, WA

Re: 1965 Rear Bumper to Body Seal Installation?

Post by kevinshi »

lavron wrote:
Wed Apr 22, 2020 10:43 pm
I think in any case, even a show car would never be marked down for the position or the lack of one because no one knows for sure how they were mounted.
Mine won't be a show car, but it will be something far more important: Mine! ;-)

Having continued to look at this... I now am starting to believe that the part is intended to be installed as pictured below.

Image

You are now going to say "...wait a minute, you are totally contradicting what you've written above." Yep. Here is my thinking...
  1. The three molded "bends" in this part all match perfectly when placed on the car like this: (a) the portion behind the flange is the same length as the flange, (b) the portion on the front of the flange is also the same length as the flange and (c) the portion above the flange and against the body of the car is exactly the right width to full the space between the flange and the body bending forward as it reaches up toward the deck. Furthermore all three of the angles are a perfect fit: (a) the ~360 degree fold that forms the smaller lips fit perfectly around the flange, (b) the ~30 degree bend is exactly the same as the angle formed by the upper angle formed by the flange as it is connected to the car and (c) the ~360 degree fold that forms the larger lips push the large flap directly downward (see next point).
  2. Despite the MPC illustrations indicating otherwise, I think it makes a whole lot more sense for the "grilled" side to act as the "deflector" of debris. By comparison the smooth side is a like a "soft underbelly." If your goal is to have this part "deflect rocks" then you want to have the more ridged side facing the rocks it is suppose to deflect. Duh. When the part is installed like this the "grilled" side of the rubber shoots down the back of the car and then faces forward. Rocks are going to come from the front of the car... so the "grill" will be responsible for reflecting stuff that is being thrown backwards by the tires. Furthermore, when installed like this the heavy ~360 degree fold gets engaged to act like a "spring" that will work to force the flap forward such that it can resist (or deflect) debris. To wit: I assert the MPC illustrations are just misleading.
  3. When installed like this the middle screws become obvious. The location of the two middle screw holes is super natural and it makes perfect sense that a self tapping screw would be used there w/out any goofy extra bending of the part to reach these screw holes. Furthermore the part easily wraps around the quarter panel corner to pretty naturally cover the quarter panel screw holes. (I think there is still a debate as to whether or not the line workers were supposed to install outer screws but the evidence clearly indicates that they did put them there, whether or not they were supposed to).
  4. After looking at it again, I think the rubber part on the above ebay listing photo is installed like this. See my comments in the edited version of that image below.
Image

The one major issue I can think of is that this *might* cause the seal to unnaturally interfere with the plates and/or plate light. I don't think it will - rather I think the seal will just drop straight behind the plate... but if it was to interfere then my new theory here will start to look very wrong...
Thanks,
kevin
1965 Caliente Convertible
5H25A525287 (76DM6204L5416)

User avatar
poboyjo65
Moderator
Posts: 7059
Joined: Thu Oct 20, 2011 9:40 pm
Location: Camden, Tenn.

Re: 1965 Rear Bumper to Body Seal Installation?

Post by poboyjo65 »

after I posted those pics yesterday I noticed the black 64 that I posted,on the bottom pic has just a few inches of the flap part left on the pass side that I didnt notice at first & the first pic of it looks like your pic where your thumb is,except the flap part is broken off on that side.(I now see the broken edge)

one other thing to keep in mind,the person who makes the shop manual was at a desk & did not work on cars.
As for the center screws, I remember taking mine out & they had a piece of dried out rubber behind each one so I know on my car they held on the seal.

also while you're back there,do you have the little brace that bolts to the bumper in the center? there are 2 holes in the bumper behind the license tag,one for the brace the other for a rubber bumper.
Image
a pic from behind the bumper;
Image
Image
Johno

lavron
Site Admin
Posts: 4710
Joined: Sat Nov 01, 2003 9:17 am
Location: Missouri, Ozarks
Contact:

Re: 1965 Rear Bumper to Body Seal Installation?

Post by lavron »

This is what mine looked like when I took it off, the deeper grooves are on the inner bend, which makes sense and the smoother side to the outside.
Image

Not sure that helps you any.

See Ya,
Mike
Mike's build thread
viewtopic.php?f=9&t=13058
Image

User avatar
kevinshi
Posts: 249
Joined: Thu Jul 17, 2014 1:56 am
Location: Bellevue, WA

Re: 1965 Rear Bumper to Body Seal Installation?

Post by kevinshi »

poboyjo65 wrote:
Thu Apr 23, 2020 2:52 pm
also while you're back there,do you have the little brace that bolts to the bumper in the center? there are 2 holes in the bumper behind the license tag,one for the brace the other for a rubber bumper.
Yep! Super helpful reminder on how to install that brace... but I do definitely have it. Yea!
lavron wrote:
Thu Apr 23, 2020 3:34 pm
Not sure that helps you any.
It does help - your picture clearly indicates that the grooved side was facing forward (because it's the dirty side)... which is further evidence that the MPC illustrations are misleading. If you still have that seal (and believe it to be factory) it would be interesting to know whether or not it has bends that imply it was wrapped around the corners (or screw holes for such) as well as its total length.

The ebay seller got back to me with a closeup of that same seal. The hanging portion has now been removed to reveal a pretty clean shot of how the seal was attached to the car.

Image

If you assume this is a factory installed seal (I think a reasonable assumption) this is pretty clear evidence. The large grooved flap of the seal has fallen off (though it was visible in the previous photo). On the portion that remains you can, however, still see the beginnings of the grooves at the top. Taken together this means the large flap hanging down was indeed oriented with the smooth side facing backwards (grooved side facing forward). Meanwhile the smaller lips are enveloping the flange and the ~ 30 degree angle conforms against the body above the flange. This is consistent with my most recent speculation on how it should be installed.

In my opinion this is now a closed case: The seal is supposed to be installed with the small lips wrapping around the flange, the ~30 degree angle on the seal conforming up onto the body above the flange, the wide section then flapping down toward the ground with the smooth side facing facing reward and the grooved side facing forward. As per my above picture showing my thumb holding it in place.

Again, I still think there is reasonable debate as to whether or not the seal was supposed to wrap around the corners. As per my previous comments, I conclude that the line workers did wrap and screw it to the corners. However I also I believe that the engineering/design intent was to have the seals trimmed to fit inside the vertical body seams located under the tail lights. A white collar vs. blue collar conundrum. As a product design/engineering stupidvisor I'm inclined to side with management overhead on this one. ;-)
Thanks,
kevin
1965 Caliente Convertible
5H25A525287 (76DM6204L5416)

lavron
Site Admin
Posts: 4710
Joined: Sat Nov 01, 2003 9:17 am
Location: Missouri, Ozarks
Contact:

Re: 1965 Rear Bumper to Body Seal Installation?

Post by lavron »

Well I was out today working on the back of my Comet and there is still a tiny part of that seal still on there.
Image

I know it is not a very big piece but the underside is the lip (it still has the flat edge, I took a picture but it was fuzzy) so it does attach the way I am holding it in the picture I posted earlier (right side facing forward on the car)

The parts car also has 3 little chunks about the same as the one on my car, they are the same flat short edge below. The parts car still has the screws in the back panel above the license plate where there is no lip on the car.
Image
kevinshi wrote:
Fri Apr 24, 2020 1:50 pm
If you still have that seal (and believe it to be factory) it would be interesting to know whether or not it has bends that imply it was wrapped around the corners (or screw holes for such) as well as its total length.
No screws on the outer edge but a '65 might be different there. I don't have it anymore it was in pieces but it did not wrap.

I think the '64 is a 3 piece seal.

See Ya,
Mike
Mike's build thread
viewtopic.php?f=9&t=13058
Image

User avatar
kevinshi
Posts: 249
Joined: Thu Jul 17, 2014 1:56 am
Location: Bellevue, WA

Re: 1965 Rear Bumper to Body Seal Installation?

Post by kevinshi »

poboyjo65 wrote:
Thu Apr 23, 2020 2:52 pm
also while you're back there,do you have the little brace that bolts to the bumper in the center? there are 2 holes in the bumper behind the license tag,one for the brace the other for a rubber bumper.
OK I need to correct my earlier response... I do NOT have this brace. (The part I "found" earlier was actually one of the two side brackets from the front).

My bumper does indeed have a hole where this brace would attach (in addition to the rubber bumper). However my rear body is missing the sheet metal to which your brace is attached (as per your above pictures). Here is a picture of my rear end (the hole is where the license plate light wire passes into the trunk compartment):

Image

MPC (see below) confirms this brace was to appear on all models save the wagon (C5GY-17B861-A). (However it did NOT appear on the Falcon).

Strange. I conclude my car simply didn't have this part... poboyjo65, what is the purpose of that brace? I speculate it provides a chassis ground (for the license plate light). On my car that ground is (poorly) provided by conductive pads that are compressed between the bumper arms and the rear frame.

Meanwhile another related question - the MPC illustration indicates a standard part (as per the "*") installed between the bumper and the bumper arms. I don't think my car had these... or perhaps they were gaskets that just disintegrated? See my two red circles below. The illustration shows these as a rectangular part.

Anyone know what these are (and whether I can source them)? My best guess is that they are fiber spacers.

Image
Thanks,
kevin
1965 Caliente Convertible
5H25A525287 (76DM6204L5416)

decathlete45
Posts: 27
Joined: Tue Aug 30, 2011 12:04 am

Re: 1965 Rear Bumper to Body Seal Installation?

Post by decathlete45 »

Did you ever get your rear bumper to body seal installed correctly? I recently ordered one from Ecklers (they sent P/N C0DZ-17808-S) and I received a 3 piece one with molded bends in what appears to be the center piece. This also appears to be a poor design from the factory as installing it the way it appears will allow moisture to accumulate energy n the fold where it’s stapled to the flange. Any help would be appreciated.

User avatar
kevinshi
Posts: 249
Joined: Thu Jul 17, 2014 1:56 am
Location: Bellevue, WA

Re: 1965 Rear Bumper to Body Seal Installation?

Post by kevinshi »

(I have massively edited the previous reply I had posted here, so if you had already read my post then you will be confused... please ignore what I had written before... the below is a wholesale rewrite.)
decathlete45 wrote:
Fri Feb 19, 2021 3:43 pm
I recently ordered one from Ecklers (they sent P/N C0DZ-17808-S) and I received a 3 piece one with molded bends in what appears to be the center piece.
The three piece C0DZ-17808-S was used on the 1960-63 sedans along with the 1964-65 wagons (& ranchero). This forum thread is in regards to the 1965 sedan which is technically C5GY-17808 however I am 99% confident can be sourced as C4DZ-17808. I installed C4DZ-17808 on my 1965 convertible.

The illustration used by many parts houses for C4DZ-17808 indicates a embossed recession in the center of this seal. As per previous comments, this feature does not appear in the Mercury MPC illustration however it does appear in the Falcon MPC illustration as well as the Mercury Shop Manual. The part I received and installed did not have such a bend. I believe this illustrated "feature" is simply installation instructions indicating that the seal should be curved to make room for the license plate (the Mercury Shop Manual clearly indicates the seal being bent toward the front of the vehicle (and behind the plate)... whereas the product illustration (incorrectly) implies it should be bent toward the rear).

Note: Should anyone get their hands on a NOS C5GY-17808... I would love to have a few pictures of the (complete) original seal (and its length)... because the part number was different... and in fact it appears the 1965 comet sedan had a part that was updated from the 1964 part (e.g. C5GY). I would not be surprised to find that the "update" to the C5GY part was was simply having it trimmed to the correct size (and I suspect it was getting installed starting in something like November 1964 - after my car was built).

Note 2: I suspect the middle piece on the C0DZ-17808 part is a similar affordance for license plate on the other vehicles (perhaps someone here who has restored one of those cars can confirm). Meanwhile there are a host of other 17808 parts available that were used on other mid-1960 Ford & Lincolns... with illustrations that look pretty similar.
decathlete45 wrote:
Fri Feb 19, 2021 3:43 pm
Did you ever get your rear bumper to body seal installed correctly?
Yes. At least I am pretty confident that I got this figured out after inspecting quite a few images of cars that had remnants of their factory seal still installed. Using the C4DZ part on my 1965 convertible:
  • The seal has one smooth side and one "grilled" side. The "grill" side faces forward (e.g. rocks are defected off the "grilled" side of the seal). When inspected from the rear of the car (sans bumper) you will see the smooth side. This is counter to the Mercury MPC illustration but consistent with the pictures I have found of the original factory seals.
  • The part will arrive too long and must be trimmed such that it extends out from the side of the car at an angle. The top trimming point is at the rear corners of the car's body. Trim at a 45 degree angle such that the lower edge of the seal is longer than the upper edge. In this way the seal angles outward from the corner of the car as it extends toward the ground. Note that some cars (including mine) had a screw hold "around" the corner indicating that the seal may have been wrapped around the body and fastened there with a screw. I speculate that this was a line worker's mistake - some dude wasn't told that the seal was supposed to be trimmed and just forced in a couple of screws to deal with the extra material... which then forces the seal to not "flap" as it would have been designed to work.
  • The part will arrive with two screws. Those are used in the middle of the seal (two holes behind the license plate). On my 1965 convertible these screws did not work to bend the seal much to generate much of a recess for the license plate... which is consistent with the Mercury MPC illustration (and contrary to the falcon MPC illustration). I am pretty sure that the rear body for the Comet and Falcon was not exactly the same... I suspect that the Falcon had an affordance for the license plate that did not appear on the Comet. The "fit" on my 1965 convertible is kind of awkward - the license plate does kind of press up against the rubber.
  • The seal is is then attached to the horizontal body flange by staples. The factory may also have used seal adhesive... but I didn't (the dang thing is hard enough to install without that mess).
  • You will know you have this part correctly attached when you conclude it was one of the hardest parts to install on the entire car :D. Its a pain in the butt.
Make sense?
Thanks,
kevin
1965 Caliente Convertible
5H25A525287 (76DM6204L5416)

Post Reply