Lou's 65 Comet Build

Re: Lou's 65 Comet Build
This is what happened to me with my old pad when I first got the car. And why I ordered a new one and was disappointed when it came in just like the old one,was hoping it would have a screw on the side s or something better than the clips . Let us know what you do Lou, thanks!

Johno
Re: Lou's 65 Comet Build
Lou,Lou's Comet wrote: ↑Sat Dec 31, 2022 8:49 amWhen you pinned your mounts did it increase feeling any vibrations from the engine??A/FX wrote: ↑Thu Dec 29, 2022 11:05 pmI also pinned my motor mounts, had the same concerns as you about possibly having the engine do damage if a mount broke.
It seems no one has a use for an ash tray these days, mine used to be for keeping my loose change. So for this build I split the face from the bin and made it bolt into the opening, the face of the ash tray now holds my power window switches. All the other switches are in their original location, I tossed the keyed ignition switch in the trash and now use “a pull to start” switch that uses a matching knob.
Jim
Yea really haven't found a use for the ashtray., was thinking cup holder, or using just the face as you did and installing fuse box behind it. But for now just use the ashtray to fill the hole.
Lou
No issues from pinning the mounts. I used a 1/2” grade 5 bolt and a nylok nut, the hole was drilled slightly oversized so the bolt would “float” in the rubber.
I did not include any luxuries such as a cup holder and I wanted a convenient location for the window switches so the ash tray area worked out great. ‘64 and ‘65 dash pad trim must be different, there are screws on a ‘64 that hold the end pieces of the trim to the dash, the center trim is held in place with clips. The screws and the window switches are visible in the attached photo.
Jim

‘64 Cyclone/ Boss 302,quads,4spd, Winters 9”
-
Joe Travers

- Posts: 2437
- Joined: Mon Sep 21, 2020 6:23 pm
- Location: Louisiana
Re: Lou's 65 Comet Build
Really cool tipLou's Comet wrote: ↑Thu Dec 29, 2022 8:54 pmDidn't really know what to do about mounts. Didn't want solid ones, vibration and all. Didn't want to spend the money on 289 hi-po mounts, and really didn't trust the stock mounts. Was worried if I broke one I may screw up my hood and I really, really don't want that to happen. So I got the stock mounts and pinned?? them. And yes I know I really didn't have to do the pass side but hey,,why not.
 I need to raise my engine just a tad. Don't know if the rubber mounts are fatigued but the Z bar is sitting a smidgeon lower @ the block than the frame rail. Something I need to address eventually for better clutch control and bushing wear.
I need to get off this forum. My 'to-do' list only gets longer each passing day
Joe

1963 1/2 Custom Hardtop
342 stroker, solid roller, T-10, 3.55 posi
-
Lou's Comet
- Posts: 1540
- Joined: Sat Nov 26, 2011 8:56 pm
- Location: Jeannette, Pa.
Re: Lou's 65 Comet Build
Did your clips come out of the padded part, or pull out of the metal dash?poboyjo65 wrote: ↑Sat Dec 31, 2022 10:12 amThis is what happened to me with my old pad when I first got the car. And why I ordered a new one and was disappointed when it came in just like the old one,was hoping it would have a screw on the side s or something better than the clips . Let us know what you do Lou, thanks!
I glued the clips into the padded dash this time. Used weatherstrip adhesive, was thinking 08115 adhesive but went with the weatherstrip adhesive. Will let it sit for awhile for adhesive to dry, then try again.
If they pullout again I will get new clips and try the 08115.
Lou
-
Lou's Comet
- Posts: 1540
- Joined: Sat Nov 26, 2011 8:56 pm
- Location: Jeannette, Pa.
Re: Lou's 65 Comet Build
Glad to here no issues from pinning the mounts!!A/FX wrote: ↑Sat Dec 31, 2022 10:54 am
Lou,
No issues from pinning the mounts. I used a 1/2” grade 5 bolt and a nylok nut, the hole was drilled slightly oversized so the bolt would “float” in the rubber.
I did not include any luxuries such as a cup holder and I wanted a convenient location for the window switches so the ash tray area worked out great. ‘64 and ‘65 dash pad trim must be different, there are screws on a ‘64 that hold the end pieces of the trim to the dash, the center trim is held in place with clips. The screws and the window switches are visible in the attached photo.
Jim
Dash pads are the same. I have the same two screws at each end of the trim. I was just getting to those screws when the end clip came out of the dash pad.
Once the top part is clipped in you need to take a awl and find the holes for the trim clips and screws.
Hopefully glueing the clips in the dash pad will help.
Lou
-
Lou's Comet
- Posts: 1540
- Joined: Sat Nov 26, 2011 8:56 pm
- Location: Jeannette, Pa.
Re: Lou's 65 Comet Build
Maybe the bushing on the block side is worn??Joe Travers wrote: ↑Sat Dec 31, 2022 1:19 pm
Really cool tipI need to raise my engine just a tad. Don't know if the rubber mounts are fatigued but the Z bar is sitting a smidgeon lower @ the block than the frame rail. Something I need to address eventually for better clutch control and bushing wear.
I need to get off this forum. My 'to-do' list only gets longer each passing day
Joe
Yea know what ya mean,,, thinking John enjoys making my list longer LOL....
Lou
-
Joe Travers
- Posts: 2437
- Joined: Mon Sep 21, 2020 6:23 pm
- Location: Louisiana
Re: Lou's 65 Comet Build
Was severely worn before I changed it out. Frame bracket wasn't cinched up to spec.
Block needs to come up just a smooch. May just fab some spacer plates to slip between the mount & bracket next chance I get up to the shop.
Joe
1963 1/2 Custom Hardtop
342 stroker, solid roller, T-10, 3.55 posi
Re: Lou's 65 Comet Build
I got that from comethead Joe! & yes I do enjoy itLou's Comet wrote: ↑Sat Dec 31, 2022 7:03 pmthinking John enjoys making my list longer LOL....Joe Travers wrote: ↑Sat Dec 31, 2022 1:19 pmI need to get off this forum. My 'to-do' list only gets longer each passing day
Joe
Lou
Lou are you putting the dynamat under the pad?
yea Lou my pad,,,the clips would pop out of both. first one then the other. I tried bending the clips,several times.when I finally get em to stay in the pad & they pop out of the dash. I may glue some studs on.
watching to see what you do first!
but gluing in fasteners on the ends sounds like a good plan ,,,but not those cheesy clips they sent, they are just like what the old pad had (it was a repo too,same brand) .I dont think those clips are made right .they are too weak to hold the pressure. I'm thinking the job is 8115 worthy ,but would like to be able to take it off if needed.with this pad being after market might make it fit better if you can tighten or loosen & shim where you need it so locknuts on studs might be good.
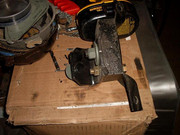
when I pinned my motor mounts I used locknuts so if it had bad vibes I could loosen it up some. instead of countersinking the pins I drilled on thru the middle v shaped MM.& ran a bolt all the way thru mm & V mount

Johno
-
Lou's Comet
- Posts: 1540
- Joined: Sat Nov 26, 2011 8:56 pm
- Location: Jeannette, Pa.
Re: Lou's 65 Comet Build
I glued in all the clips into the pad and checked them today and they actually feel really solid. Tomorrow I will try to reinstall it.poboyjo65 wrote: ↑Sun Jan 01, 2023 12:03 amI got that from comethead Joe! & yes I do enjoy ithe use to say he enjoyed spending someone else's money! think I already had it but he made me worse.


Lou are you putting the dynamat under the pad?
yea Lou my pad,,,the clips would pop out of both. first one then the other. I tried bending the clips,several times.when I finally get em to stay in the pad & they pop out of the dash. I may glue some studs on.
watching to see what you do first!
but gluing in fasteners on the ends sounds like a good plan ,,,but not those cheesy clips they sent, they are just like what the old pad had (it was a repo too,same brand) .I dont think those clips are made right .they are too weak to hold the pressure. I'm thinking the job is 8115 worthy ,but would like to be able to take it off if needed.with this pad being after market might make it fit better if you can tighten or loosen & shim where you need it so locknuts on studs might be good.
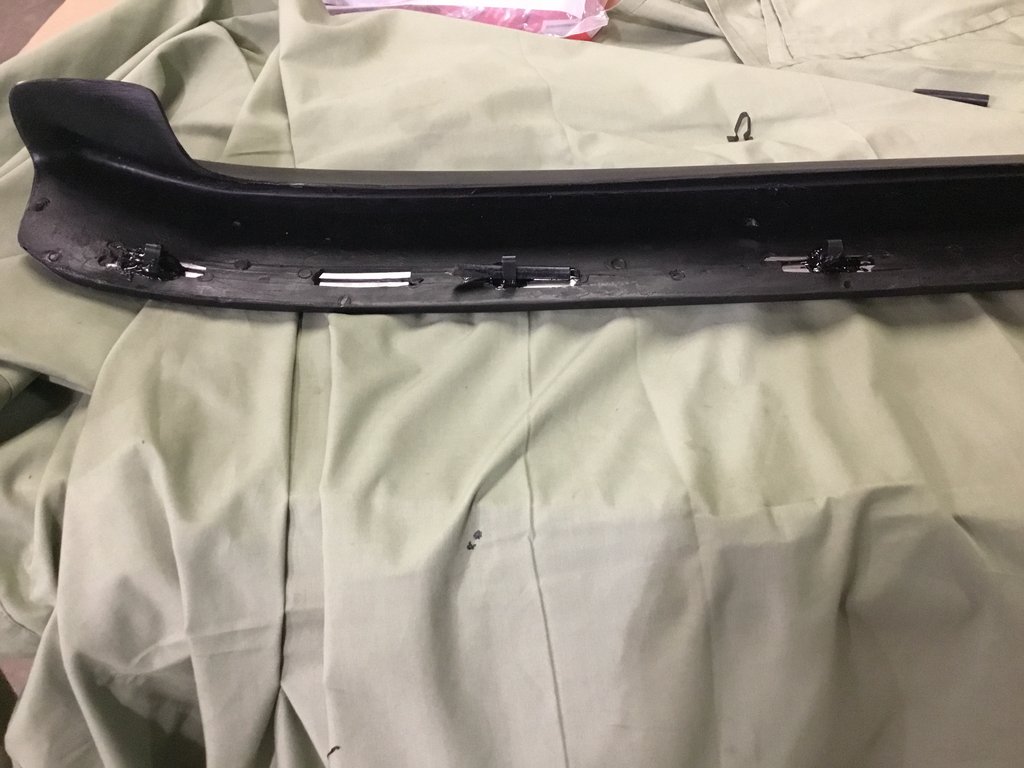
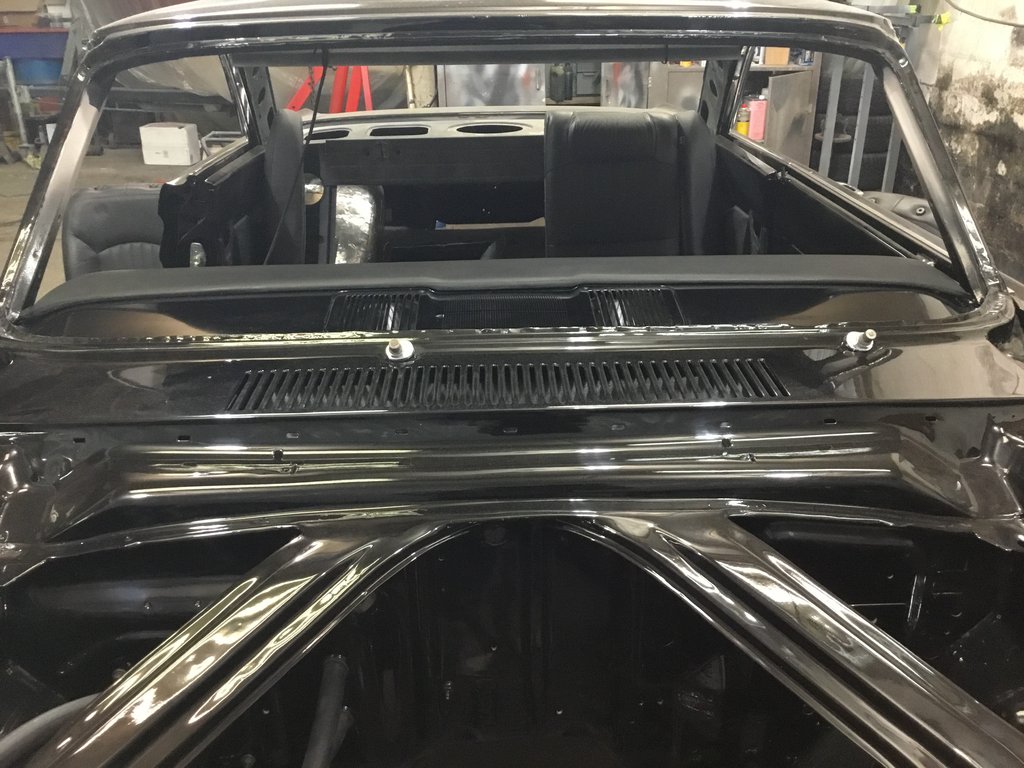
I plan on installing "locks"?? In the clips from underneath metal dash so the clips can't pull out of the metal dash. Here is a picture with a lock installed in one of the clips. This will be under the dash to keep the clip from popping. I just used some hard plastic line I had laying around that was the right size.
I don't plan on anything between the pad and the metal dash. I did install Dynamat to the inside of the metal dash, but was careful to leave room around where the dash pad clips come thru. Didn't want the mat to interfere with the clips snapping in place.
Hopefully this works.
Nothing wrong with spending other peoples money
Lou
-
Lou's Comet
- Posts: 1540
- Joined: Sat Nov 26, 2011 8:56 pm
- Location: Jeannette, Pa.
Re: Lou's 65 Comet Build
Installed the dash pad. It took a few steps but none of the clips popped out of the pad or the dash, and the pad feels firmly attached.
Agree with John that the clips are "cheesy" and the weak link. When I squeezed them to install into the dash pad they don't spring back to what they were, so they were loose to begin with. So I removed all the clips and spread them back to their original shape/spread.

After getting clips back to shape Instead of squeezing the clips to install I installed them into the pad with the clip aligned with the groove, (like the left 2 in picture) then twisted them 90 degrees to get them clipped in place. They fitted tighter this way.
Removed the clips and cleaned them with cleaner, also cleaned the slots with cleaner. Then I reinstalled the clips by lining them up in the slots and twisting them. They still had a little play in them, so I took a pair of external snap ring pliers and used them to spread the installed clips from the inside to tighten them up in the pad slots more.

Then I positioned the dash so I could line up all the clips with the openings in the dash, and then glued the clips in place.
I used 3M weatherstrip adhesive, I just squeezed some into each clip/groove. Then after about 3 hours I did it again, which kind of filled the inside part of the clip

Let it sit a few days, then I cleaned up the slots in the metal dash of excess paint with a small file. Took Q-tips and coated the sides of the clips and the slots in the dash with white grease. (I don't think I would have used the grease if I wasn't using locks to hold the clips into the dash)

Installed the pad onto the dash, most of the clips popped right into place, enough to keep the pad in place.
I then made the locks for the clips. Originally I used pieces of 1/4 OD plastic line, think It was from air brakes? But the line bent easy and really wanted something better. Found these driveway markers at Home Depot. The white post was 1/4 OD and the orange was 5/16 OD. I bought both just in case. The white 1/4"OD worked perfect. I cut 3" lengths and ground a point on them to help install.

Then installed them from under the dash into the pad clips, they spread the clips out tight and are longer than the slots so the clips can't come out.
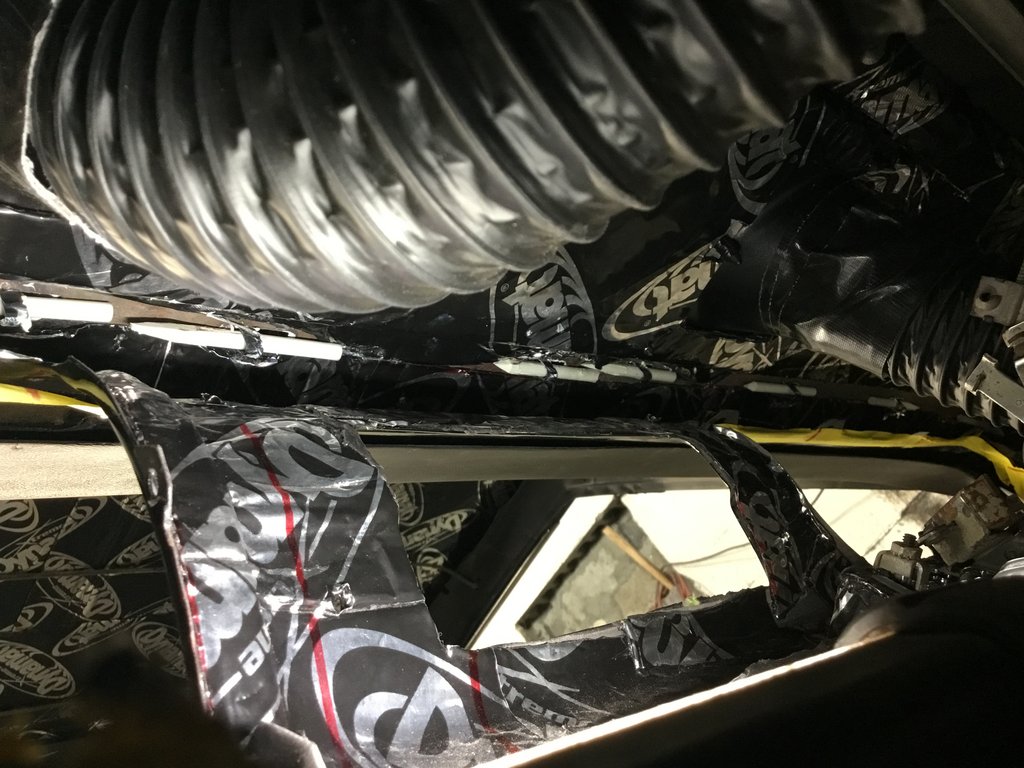
Pad fits nice and tight.

Glad that's done, also want to thank Fred again for the advice on installing pad before windshield
I moved on to my gauge cluster and got the gauges wired. I am going to use two connectors so If I need to do anything later I can remove the cluster without disconnecting all the individual wires.

Next to install the new gauge, glovebox and right end dash bezels.
Lou
Agree with John that the clips are "cheesy" and the weak link. When I squeezed them to install into the dash pad they don't spring back to what they were, so they were loose to begin with. So I removed all the clips and spread them back to their original shape/spread.
After getting clips back to shape Instead of squeezing the clips to install I installed them into the pad with the clip aligned with the groove, (like the left 2 in picture) then twisted them 90 degrees to get them clipped in place. They fitted tighter this way.
Removed the clips and cleaned them with cleaner, also cleaned the slots with cleaner. Then I reinstalled the clips by lining them up in the slots and twisting them. They still had a little play in them, so I took a pair of external snap ring pliers and used them to spread the installed clips from the inside to tighten them up in the pad slots more.
Then I positioned the dash so I could line up all the clips with the openings in the dash, and then glued the clips in place.
I used 3M weatherstrip adhesive, I just squeezed some into each clip/groove. Then after about 3 hours I did it again, which kind of filled the inside part of the clip
Let it sit a few days, then I cleaned up the slots in the metal dash of excess paint with a small file. Took Q-tips and coated the sides of the clips and the slots in the dash with white grease. (I don't think I would have used the grease if I wasn't using locks to hold the clips into the dash)
Installed the pad onto the dash, most of the clips popped right into place, enough to keep the pad in place.
I then made the locks for the clips. Originally I used pieces of 1/4 OD plastic line, think It was from air brakes? But the line bent easy and really wanted something better. Found these driveway markers at Home Depot. The white post was 1/4 OD and the orange was 5/16 OD. I bought both just in case. The white 1/4"OD worked perfect. I cut 3" lengths and ground a point on them to help install.
Then installed them from under the dash into the pad clips, they spread the clips out tight and are longer than the slots so the clips can't come out.
Pad fits nice and tight.
Glad that's done, also want to thank Fred again for the advice on installing pad before windshield
I moved on to my gauge cluster and got the gauges wired. I am going to use two connectors so If I need to do anything later I can remove the cluster without disconnecting all the individual wires.
Next to install the new gauge, glovebox and right end dash bezels.
Lou
-
Lou's Comet
- Posts: 1540
- Joined: Sat Nov 26, 2011 8:56 pm
- Location: Jeannette, Pa.
Re: Lou's 65 Comet Build
Thinking about putting a safety switch on my clutch pedal. So Comet will only start with clutch pedal pushed. Was going to just fab something up but thought I would ask if anyone here has a safety switch and if so what did ya use.
Thanks!!
Lou
Thanks!!
Lou
Re: Lou's 65 Comet Build
Awesome solution for the dash pad clips Lou. I had the same issue and clued the clips to the pad with silicon, but I bent the clips to make them wider. When I installed it I had to use a rubber hammer to set the clips in the dash It worked good. I would love to put the locks in like you did but there is no way I'm getting under the dash anymore with the counsel and air conditioning tubing under there now.
Tom
Tom
tomb's 65
Re: Lou's 65 Comet Build
Not a bad idea. You do not necessarily have to mount the switch on the pedal under the dash, it could be under the hood or even under the car on the Z bar or clutch rod. A micro switch would work well because it can be wired for normally open or normally closed. Or use a ‘60’s-‘70’s Chrysler (sic) cruise control switch, they were mounted to be activated by the brake pedal and had a N/O and a N/C terminal on them. We use them on Hot Rods quite often.Lou's Comet wrote: ↑Thu Jan 05, 2023 7:15 pmThinking about putting a safety switch on my clutch pedal. So Comet will only start with clutch pedal pushed. Was going to just fab something up but thought I would ask if anyone here has a safety switch and if so what did ya use.
Thanks!!
Lou
Jim
‘64 Cyclone/ Boss 302,quads,4spd, Winters 9”
Re: Lou's 65 Comet Build
Was a guy on tffn used a mid 70's truck brake light switch for his brake lights on his falcon. he took out the rubber bump stop for the brake pedal arm & used that mount to hold the switch. I'm not sure if clutch even has a bumpstop,but I'm sure you could make something & it has a lot of adjustment. But any brake light switch might work if you found one built more like you want it.
here's one from a-zone but most any parts house carries them in stock.
https://www.autozone.com/electrical-and ... lsrc=aw.ds
Lou I think the pad has to be trimmed to fit the chrome trim on the face. think you are deleting that right? but will you have to trim the pad to fit your custom dash? ....Looks good on there btw !
does the pad hang over the defog/speaker grill a little? seems to overhang bout 1/4'' on my old pad.
Johno
-
Lou's Comet
- Posts: 1540
- Joined: Sat Nov 26, 2011 8:56 pm
- Location: Jeannette, Pa.
Re: Lou's 65 Comet Build
Thanks guys, I think I will just use the brake switch like John showed. I have used them a few times and the adjustment range is nice! Maybe I can make a bracket that will hold 2, one for brake light and one for clutch safety
Lou
Lou