Joe, to clarify I was talking gas tank. Yes Ill keep the vents too.Joe Travers wrote: ↑Fri Mar 18, 2022 12:05 pmFred, if it's any consolation- I LOVE MY COWL VENTS
Joe
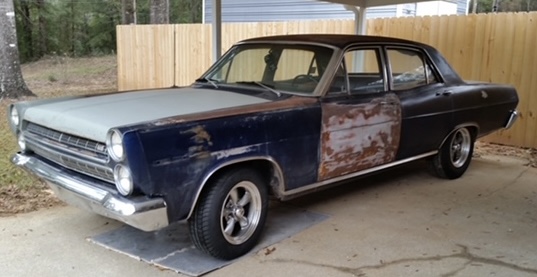
poboyjos ride
Re: poboyjos ride
I'd rather do it myself if it's done right or not,,,isn't that what hotrodding is all about

Re: poboyjos ride
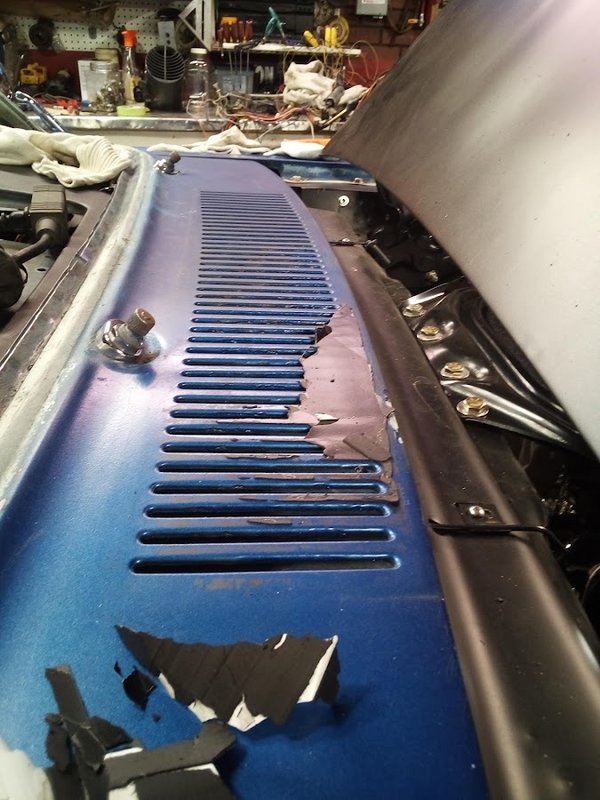
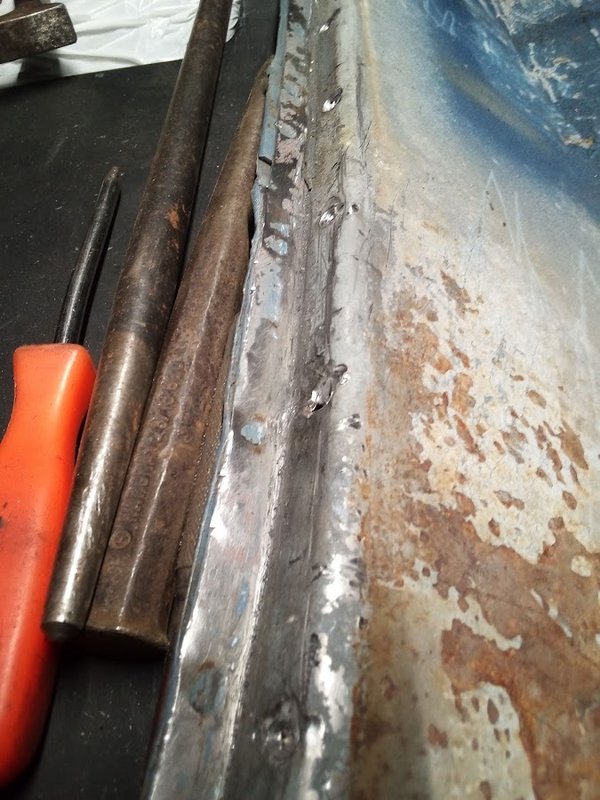
Nice work on the cowl Johno. Did you cover the hats and treat or paint the inside while the cowl was removed? Was wondering, the 66 Stangs I’ve messed with have all had bad rust in the cowl areas. Also the lower windshields had brass on the lower potion of the A pillars, had to clean that stuff up to do welding.
Motor Safe,
Lee

Re: poboyjos ride
thanks Joe!
yea Fred I just screwed it into the other black molding.but that molding may be different than a 64's.but it would look good with the 64's 3 chrome moldings that go across the top. yea happy with it I guess,no regrets,truth be I hardly ever think about it.
Oh if any of y'all run a magnetic cowl vent cover like I was,take it off or lift it up every now & then. I guess I never moved mine in 5-6 years & it stuck,had to scrape it off in pieces & it took paint off in a couple places;

Johno
Re: poboyjos ride
Thanks Cave! but it's just sitting on there for now. just got the old one cut & drilled off last night & set the new cowl on for a look. but yes I will seal it up good & cover the hats with the stove pipe caps that I posted a pic of on the page before this one. (no brass on these pillars.)Caveman49 wrote: ↑Fri Mar 18, 2022 1:26 pmNice work on the cowl Johno. Did you cover the hats and treat or paint the inside while the cowl was removed? Was wondering, the 66 Stangs I’ve messed with have all had bad rust in the cowl areas. Also the lower windshields had brass on the lower potion of the A pillars, had to clean that stuff up to do welding.
Johno
Re: poboyjos ride
Looks great John! I know you're working on the cowl, but, I really like what you've done with the trunk.
Jim
Jim
Re: poboyjos ride
The stove pipe covers look like they would work but being galvanized welding them will be an issue. Why not just cut the air tower out and weld in a panel to cover the hole? You could then seal it with seam sealer and it will outlast your lifetime.poboyjo65 wrote: ↑Fri Mar 18, 2022 1:38 pmThanks Cave! but it's just sitting on there for now. just got the old one cut & drilled off last night & set the new cowl on for a look. but yes I will seal it up good & cover the hats with the stove pipe caps that I posted a pic of on the page before this one. (no brass on these pillars.)Caveman49 wrote: ↑Fri Mar 18, 2022 1:26 pmNice work on the cowl Johno. Did you cover the hats and treat or paint the inside while the cowl was removed? Was wondering, the 66 Stangs I’ve messed with have all had bad rust in the cowl areas. Also the lower windshields had brass on the lower potion of the A pillars, had to clean that stuff up to do welding.
Just a thought.
Jim
‘64 Cyclone/ Boss 302,quads,4spd, Winters 9”
Re: poboyjos ride
Jim (afx) I wasn't going to weld them in,glue them with panel adhesive was what I had in mind. in fact I'm going to glue the whole cowl top on with no welding . gets it all done at once ,attached & sealed all at once.
Thanks Jim
Johno
-
Lou's Comet
- Posts: 1544
- Joined: Sat Nov 26, 2011 8:56 pm
- Location: Jeannette, Pa.
Re: poboyjos ride
Looks good John.
Doesn't look like it will take much to clean up and prep for the adhesive. Are you going to coat the top of the inner cowl with anything, after you fix the hats? If it has surface rust maybe think about something like POR, it will seal any small pin holes you might miss.
Again Nice Work!!
Doesn't look like it will take much to clean up and prep for the adhesive. Are you going to coat the top of the inner cowl with anything, after you fix the hats? If it has surface rust maybe think about something like POR, it will seal any small pin holes you might miss.
Again Nice Work!!
Re: poboyjos ride
Yea I'll Por15 it. Probably spend a few weeks getting it all prepped & fitted ,get it screwed on like we talked about,then before I glue it take it & my hood to a painter ,let him fix my boo boo on the hood & paint them.Lou's Comet wrote: ↑Fri Mar 18, 2022 7:59 pmLooks good John.
Doesn't look like it will take much to clean up and prep for the adhesive. Are you going to coat the top of the inner cowl with anything, after you fix the hats? If it has surface rust maybe think about something like POR, it will seal any small pin holes you might miss.
Again Nice Work!!
Johno
Re: poboyjos ride
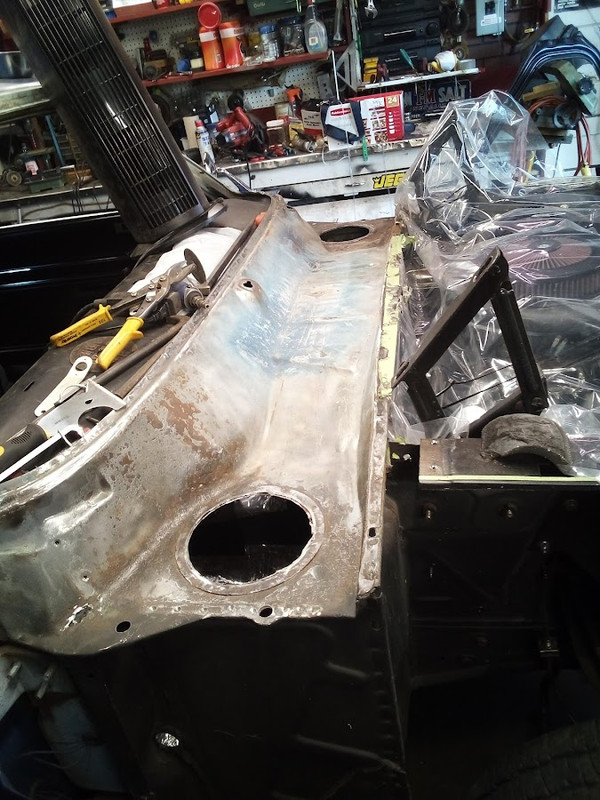
Thanks Tom ! but long way to go.I just laid it on to see how it fit. & pretty happy with what I see & how it fits so far. Lots of grit to get off this cowl bottom. but at least all of the rust is on the sides & not in the middle where it would be a stretch to work on;

after getting my bearings I cut the rest of the old cowl off. a little more work but I didnt want to just whack it off & wished I would have left something for reference aftewards. Hated to cut up the old cowl,someone could have used it but it was in the best interest of my car.
Glad to find shiny metal at the windshield pinch!
I still have the sides if anyone wants them ,the right is not as good ,cut up worse & a small hole rotted thru but the driveside looks pretty good. But if anyone wants them for the price of the stamps hit me up;
Johno
Re: poboyjos ride
Wow, those hats look extremely good for their age. Do you know what adhesive you’re going to use. I was looking at an autobody shop forum and a lot of the pros there use adhesives, some say if it’s structural to weld, and some say it’s ok. They say you can spot weld with the adhesive as long as it has good separation between the welds. Apparently it’ll only burn the adhesive around the spot weld.
I never tried adhesive for body panels, but hear that’s the way to go, just make sure the material is Real clean, and lined up good when you mate them up.
It’s all looking really good Johno, keep us updated on the adhesive usage, I will definitely be following.
Motor Safe,
Lee
I never tried adhesive for body panels, but hear that’s the way to go, just make sure the material is Real clean, and lined up good when you mate them up.
It’s all looking really good Johno, keep us updated on the adhesive usage, I will definitely be following.
Motor Safe,
Lee
Motor Safe,
Lee
Re: poboyjos ride
A/FX/Jim my hats off to you! 
Got started with a cupped wire wheel on a drill & they got in the way. figured for less dust than brushing them I could cut them out of the way & make it easy to brush that wall behind them. But I'll still glue & screw .
Lee I got the 3m 08115. used it before & loved it. I did a little test & gave up trying to make it fail. I learned about it from Lou'sComet build thread on here. you can use it as seam sealer too,sand it or paint it. It's wonderful, I'm in love with it.

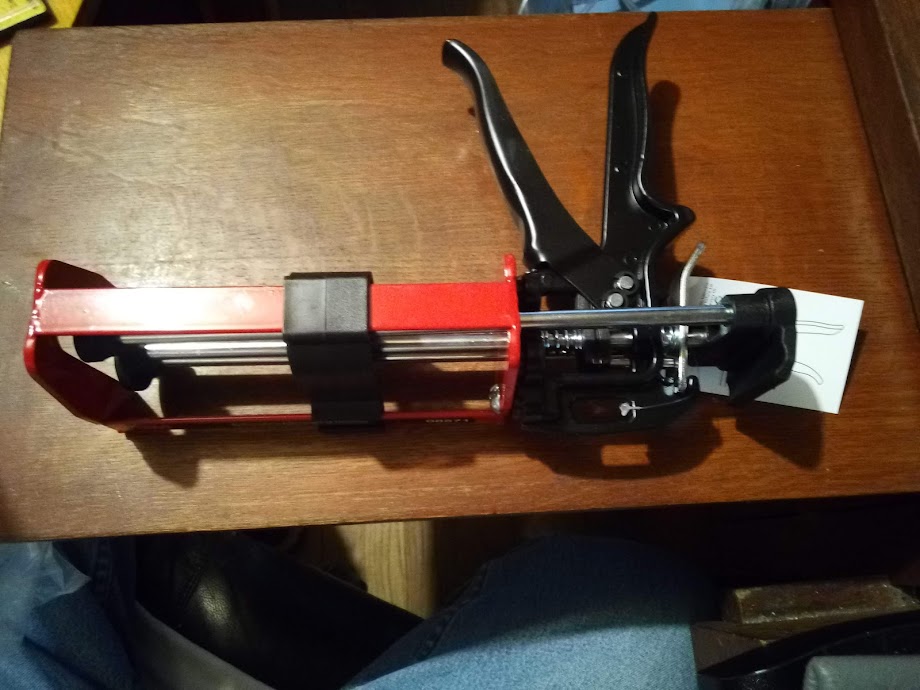
double barrel gun
Got started with a cupped wire wheel on a drill & they got in the way. figured for less dust than brushing them I could cut them out of the way & make it easy to brush that wall behind them. But I'll still glue & screw .
Lee I got the 3m 08115. used it before & loved it. I did a little test & gave up trying to make it fail. I learned about it from Lou'sComet build thread on here. you can use it as seam sealer too,sand it or paint it. It's wonderful, I'm in love with it.
double barrel gun
Johno
Re: poboyjos ride
You’ve apparently worked with adhesive before, it helps to have the tools. What did the adhesive dispenser set you back, $90 - $100?
Am I seeing that right, you cut the hats off might just patch ‘em like Jim mentioned.
Motor Safe,
Lee
Am I seeing that right, you cut the hats off
 might just patch ‘em like Jim mentioned.
Motor Safe,
Lee
Motor Safe,
Lee
-
Lou's Comet
- Posts: 1544
- Joined: Sat Nov 26, 2011 8:56 pm
- Location: Jeannette, Pa.
Re: poboyjos ride
Hey John, looking good !!
Just a thought but if it was me I would get a second tube of 8115 just in case, ya know.
If you don't open it you can always send it back.
You need to put a coating on the bonding area, (perimeter) of both surfaces, then run a bead on one of them (I would do this to the surface on car.) one tube might do it, might not. Plus the adhesive you will need to replace or cover the hats. But you don't want to run out in the middle of the job.
I use tin brushes to spread the initial coating on the two bonding surfaces. They are cheap, work great and ya toss them when done. Then run like a 3/16 bead in the middle of the bonding strip so it squeezes out both sides. If you want to be sure run a little bigger bead, but you want it to squeeze out both sides. You can do a test when you first open the tube. Ya need to run a inch or two out first to make sure it is mixed. You can use that inch or two to test with some scrap to see if it is squeezing out both sides.
But you do not want to run out of glue !
Also after prepping the car, and inside of panel, I grind the bonding edge with 24-36 grit on a angle grinder (rough it up good) Then cover that edge with 3/4" masking tape. Then you can coat the car side with POR or whatever you decide to use. And I would also do the inside of the new panel. Prep the edge, tape it and paint the inside of the panel. The paint that comes on panels in my experience doesn't hold up well. I use a spay can of VHT epoxy to do the inside of panels.
You may want to do the inside of the cowl panel before you send it to your painter.
It is coming along nicely!
Love the Captain America poster. Had one in my first shop!
Lou