Lavron's '64 Build Thread

The Era of The Square Body Racing Comets
lavron
Site Admin
Posts: 4710
Joined: Sat Nov 01, 2003 9:17 am
Location: Missouri, Ozarks
Contact:

Re: Lavron's '64 Build Thread

Post by lavron »

SASSY wrote:Floor looks AWE!!some
Thanks Fred. I am glad I have a mostly finished trunk now :roll:
Image

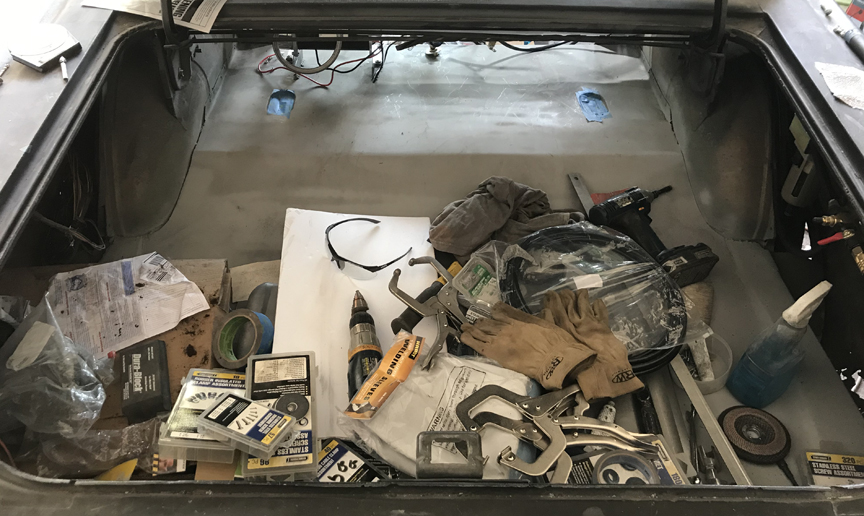
Looks like I need to get some stuff organized :oops: About time for a cleanup day.

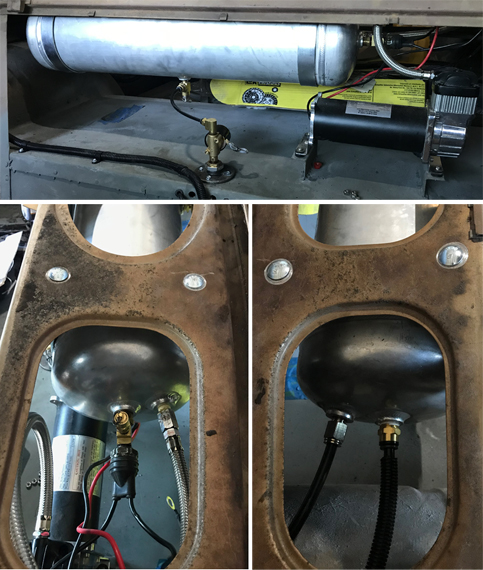
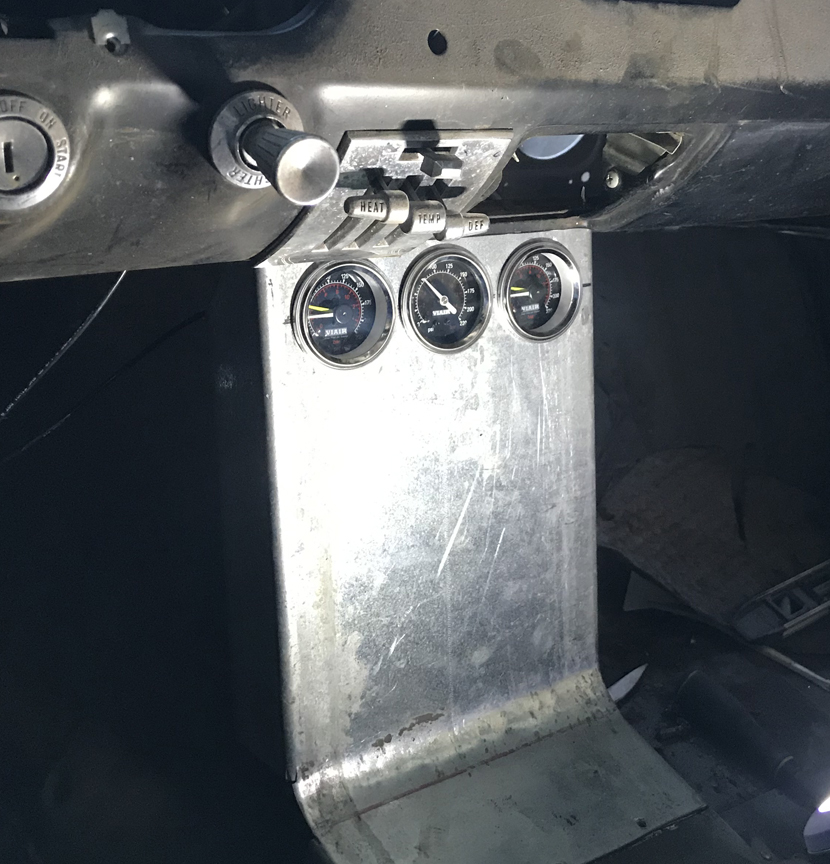
I just realized today that I have poking at my air ride system off and on this week and as soon as a couple more fittings get here it is actually all installed (beside the gauges and electrical wiring)
Image

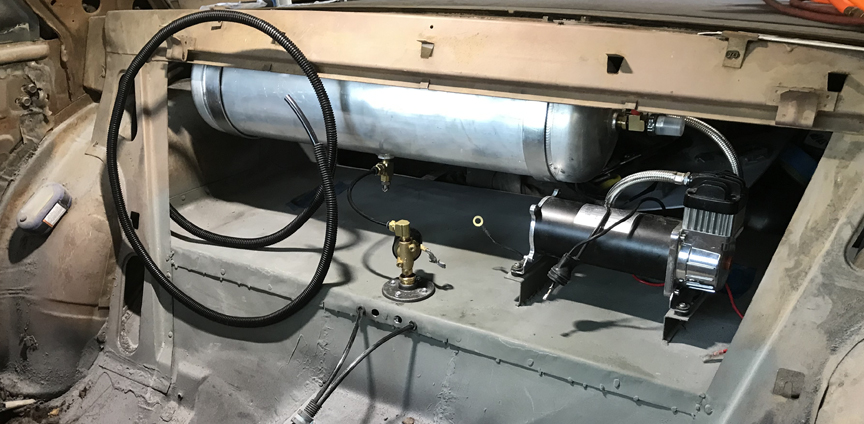
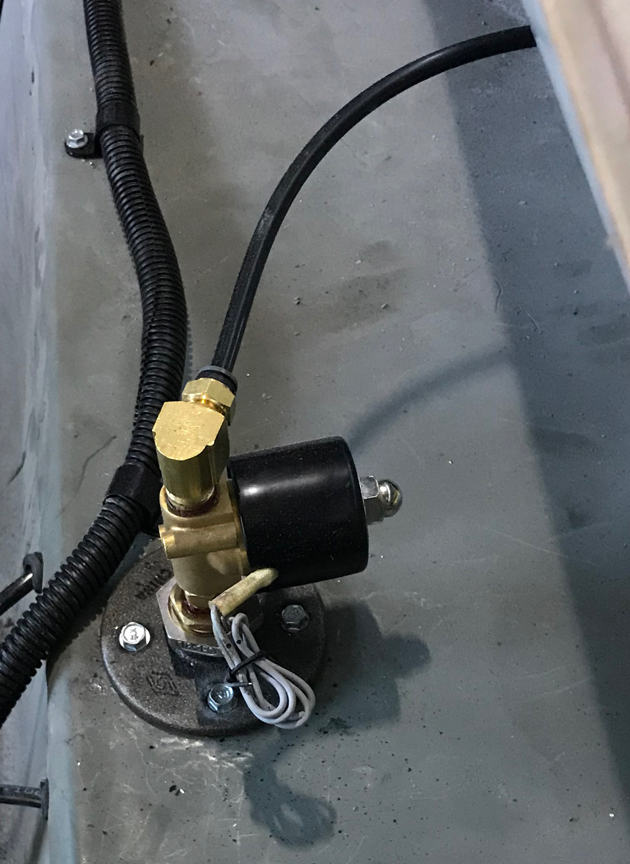
That funny little thing mounted to the floor in front of the tank is what I am going to call my lazy man tank drain, it is the only electric solenoid on the system, everything else is manual (not counting the compressor automatic pressure switch control) I figured if it was easy to drain the condensation out of the tank I would be more likely to do it (just push a button) it blows the water out under the car through the floor, there is also a manual drain on the bottom of the tank. I figure if you give the button a push every time you start the car it will keep the system dry.

The curled up line is the one that goes to the control box, two of the fittings I am missing are the ones to attach it and the one to attach the water separator to the tank (in the upper picture you can see the separator on the right side just behind the wheel well, it also does a automatic purge controlled by a float in it), as soon as they get here it will take like 10 minutes to get them hooked up.

Also, so far, all the bags are holding air so the part of the system from the control box on is leak free :D

See Ya,
Mike
Mike's build thread
viewtopic.php?f=9&t=13058
Image

lavron
Site Admin
Posts: 4710
Joined: Sat Nov 01, 2003 9:17 am
Location: Missouri, Ozarks
Contact:

Re: Lavron's '64 Build Thread

Post by lavron »

Air ride is finished except for hooking up the wiring, which I can't do now because there is no wiring in the car (the taillight harness is still there for some reason)

Here is a mini rundown of how it all works, I know I had the schematic I drew up before I started but this is the actual layout :P

To start with there is the compressor (WOLO-860c), basically the only electrical device in the system (except for the pressure switch and my lazy man drain), and then to the lower left picture shows the end of the tank with two ports, the front port (left in picture) has a reducer bushing from 3/8" to 1/8", a 1/8" street tee with the pressure switch and pressure relief valve screwed into it (tank is rated at 200#, relief valve 175# and the switch comes on at 110# and off at 145#) The other port is 1/4" and the compressor attaches there through a check valve. The right picture shows the right end of the tank that has a 1/4' to 3/8" push to connect (PTC) fitting and a line running to my accessory port, and the center port is 3/8" to 3/8" PTC fitting going to the water separator. (accessory port and water separator in the next picture down)

Image

The next thing after the tank is a water separator with an auto purge drain (I still need to drill a hole and attach a tube to the bottom) It drains by a float in the bowl, when it gets so full it opens a valve and releases the water, not sure if the bouncing/moving car will effect this but I don't think I am the first person to install one in a vehicle. The line exiting the back of the WS loops and runs along the wheel well and then on to the control box. The other part shown behind the WS is what I call an accessory port (AP), it has a valve stem filler (I call those Schrader valves but not sure that is the proper term) a ball valve and quick connect for an air hose. You can see attached to the AP is a couple of male quick connects screwed together to make a union with the shop air (If needed you can fill the tank with a tire fill valve or shop air)
Image

The lower picture shows the control valve box you have seen before but I added a 3/8" PTC to the manifold on the back and hooked up the 3/8" line from the WS (the big line in the middle) I also added the gauge tees to the rear bag lines and ran the 1/8" tube to the gauge cluster, there is also a tee in the main line coming in with a line that runs to the tank pressure gauge.

The front bag lines got tees as well under the dash and 1/8" tube ran to the gauge cluster.

I mounted the air gauges in the center console, the center one shows tank pressure, the dual needle ones on the left and right are the respective bags on each side, the white pointer is the rear bags and the yellow pointer is the front bags.
Image

The final picture is just my Lazy Man Tank Drain (LMTD) a little closer, the electric valve there is what most sane people use to control their air bags, an electric style control would have 8 of these (4 pairs) one to fill the bags, one to release the air (I just have manual paddle valves) there is a momentary contact button below the paddle valves on the control box that the hot wire will go too, and the other wire is ground (I believe ether wire can be used) so push and hold the button to activate the solenoid (drains tank) release to shut valve again. (there is also a shutoff switch under the paddles for the air compressor that will actually run to a relay to disable the compressor if needed) The LMTD is mounted on a cast 1/2" floor flange.
Image

I didn't show the air bags in this but you can look back in the build and see how they are set-up.

I am actually going to put a big checkmark on the air ride system because I am including the wiring in the wiring harness build :P

See Ya,
Mike
Mike's build thread
viewtopic.php?f=9&t=13058
Image

User avatar
SASSY
Moderator
Posts: 5135
Joined: Sat Jan 07, 2006 12:32 am
Location: Wynndel, BC CANADA

Re: Lavron's '64 Build Thread

Post by SASSY »

Cool Mike!
Looking forward to seeing it not only go up and down on its own,, but back and forth too :lol:
Fred
I'd rather do it myself if it's done right or not,,,isn't that what hotrodding is all about

Image

lavron
Site Admin
Posts: 4710
Joined: Sat Nov 01, 2003 9:17 am
Location: Missouri, Ozarks
Contact:

Re: Lavron's '64 Build Thread

Post by lavron »

SASSY wrote:Cool Mike!
Looking forward to seeing it not only go up and down on its own,, but back and forth too :lol:
Fred
Me too, getting closer every day, I think I will make it maybe this year but definitely next I think not too bad for everything I have done in the last year and 3 months (hard to believe seems longer to me) won't be finished but hopefully all the mechanical work will be done and just body work/interior left to do. Sometime I will post a list (really, really long) of all the parts I have used on the car, really don't know why except for my own reference, I don't think anyone will want to read it :roll: :P I have used almost all off the shelf Ford parts and a few other makes of also off the shelf stuff, almost no custom parts (unless I made them) definitely done in the hot rodder style I think :P

I have everything to finish the motor except the head is at the machine shop and I have not gotten my cam (one of the other custom parts) and timing set yet, the next hold up on running the car will be the fuel and intake systems, I have the carbs but have not gotten the intake cast yet (might be my next push) and I have not got my fuel pump, lines and regulator (I know mostly what I want and how I want to do it, having a bit of a hard time finding a 3# rated return regulator {that is cheap enough}).

Anyway I will quit rambling :roll: Today I tidied up the air lines and moved the two front gauge tees to be back where the rear ones are, that made one line too short and I am all out of 1/4" tube so I will order more (it is currently hooked up, line just runs across the foot well on passenger side) still not sure if I have any leaks, I need to air the bags and record the pressure on the gauges and then recheck without messing with anything after a few days, not sure how fun chasing down leaks will be :roll:

I need to quit procrastinating on pulling the car back apart and getting it tipped up to clean up and check all my welds on the bottom of the car, before I do that I want to clean the car really good by getting all my stored stuff and tools out and rolling it outside so I can wash it good and clean my work area up a bit.

See Ya,
Mike
Mike's build thread
viewtopic.php?f=9&t=13058
Image

lavron
Site Admin
Posts: 4710
Joined: Sat Nov 01, 2003 9:17 am
Location: Missouri, Ozarks
Contact:

Re: Lavron's '64 Build Thread

Post by lavron »

Image

I love having the car down on the floor, I tend to get used to it at a particular height and then just taking it off the dollies drops it down a couple of inches, gives it a different feel.

I was working on another project today but while waiting for paint to dry I went ahead and cleaned the Comet out and got all the stuff off the fenders, etc. (catch-all at times) swept everything out on the interior and blew all the cracks out with the air blow gun and even finished up with the vacuum, I don't think it has been this clean since I have owned it :P Still want to roll it out and hose it off plus wash off the shed floor so I can start a new mess :roll:

I discovered a couple of issues with some air fittings, one of the gauge tees will pop off and let all the air out of the left front bag so it will need replaced, I think I will see if I can't find some of a better quality and just replace all of them (don't trust them) I think I have a slow leak in one rear line and the only thing that I have changed is adding the tees and gauges so I suspect it is one of the tees. Also think there is a slow leak on the compressor/tank side of the check valves, I may remove all the fittings and re-install them with fresh sealer but will probably do that later.

The last thing I need to adjust is the rear park brake it certainly will not stop the car from rolling.

Fun times!

See Ya,
Mike
Mike's build thread
viewtopic.php?f=9&t=13058
Image

User avatar
Jims65cyclone
Posts: 2764
Joined: Sun Nov 23, 2014 10:29 pm
Location: Lexington, SC

Re: Lavron's '64 Build Thread

Post by Jims65cyclone »

lavron wrote:I think I have a slow leak in one rear line and the only thing that I have changed is adding the tees and gauges so I suspect it is one of the tees. Also think there is a slow leak on the compressor/tank side of the check valves, I may remove all the fittings and re-install them with fresh sealer
Soap 'em! Some dish detergent in water, painted or sprayed on will show you where all your leaks are. :wink:

Jim
Image

lavron
Site Admin
Posts: 4710
Joined: Sat Nov 01, 2003 9:17 am
Location: Missouri, Ozarks
Contact:

Re: Lavron's '64 Build Thread

Post by lavron »

Jims65cyclone wrote:Soap 'em! Some dish detergent in water, painted or sprayed on will show you where all your leaks are.
I will probably do so starting with the ones I suspect he most. I know I have one bad gauge tee so I ordered a whole new set and will pitch the one I know is bad and have full set of replacements if I need them.

Sort of a big deal today to me and I know it is not much but I rolled the Comet outside for the first time in over a year and gave it a bath, inside and out, I have been collecting quite a bit of grinding dust etc, and I wanted to wash the floor in the shed as well.

With the floors repaired the interior is more like a bath tub than sieve when it gets water in it, my shop vac is on the blink so I had to sponge the water out :roll:
Image
I know the pictures are small but you have seen most of them before, just dustier :P Of course being out in the bright sunshine for the first time (and no tools, parts or dirt covering the floor) I could inspect the floor pretty good and they look pretty good.

I didn't get too far out of the shed, if I had turned the wheels the other way I could have taken a long ride :P This is close to ride height.
Image
I know there is no front on the car so not the prettiest thing to look at.

Of course I had to let the air out. The front shot would have been cool if I had kept my finger out from in front of the lens
Image
I should shoot some black primer on the rusty part so it wouldn't stand out so bad, but I guess it doesn't matter right now, I don't like it but I know I will get it fixed eventually.

I think it might be time for a new sig pict. I know the front fender looks a little wonky in this shot but it is not bolted to the car, just sitting on there
Image
It was a little tough to push it back into the shed, it is slightly up hill so I finally used the Chuck Wagon UTV to push it back in.

It is about time to start soaking the rear bumper bolts in PB Blaster so I can get the bumper off without, hopefully, breaking any bolts, and I need to get the seats back out (and the tracks fixed) then pull the rest of the windows, the tough part is finding a place to store all that stuff, the rear glass is sitting on the seat of the red truck, I will probably just stick all the glass in there and pad between them.

I need to make sure I have everything on hand before I flip the car up so I can get everything done and get it back on the ground quickly and hopefully do the final assembly of the running gear.

Currently the car is cleaned out and not storing too much (a few things in the trunk) so I am going to try and keep it cleaner for a while, I will glad when I can put the car together and not have to store the parts anymore it should give me more garage space :roll:

See Ya,
Mike
Mike's build thread
viewtopic.php?f=9&t=13058
Image

User avatar
poboyjo65
Moderator
Posts: 7058
Joined: Thu Oct 20, 2011 9:40 pm
Location: Camden, Tenn.

Re: Lavron's '64 Build Thread

Post by poboyjo65 »

Its down right low! you're gonna need a skid plate,maybe one with little wheels! :lol:
Image
Johno

popscomet
Posts: 9689
Joined: Sat Jan 01, 2011 11:19 pm
Location: Jacksonville, Arkansas

Re: Lavron's '64 Build Thread

Post by popscomet »

I think what you need IS curb feelers,,,fuzzy dice and twin spotlights and dingle berries hanging in the back glass,,,,then it will fit right in !! of course this is POP's personal opinion......keep up the good work !! pop
Image
pop/glenda

User avatar
SASSY
Moderator
Posts: 5135
Joined: Sat Jan 07, 2006 12:32 am
Location: Wynndel, BC CANADA

Re: Lavron's '64 Build Thread

Post by SASSY »

Love the new pic , that's really Stylin!!
I'd rather do it myself if it's done right or not,,,isn't that what hotrodding is all about

Image

User avatar
Jims65cyclone
Posts: 2764
Joined: Sun Nov 23, 2014 10:29 pm
Location: Lexington, SC

Re: Lavron's '64 Build Thread

Post by Jims65cyclone »

Lookin' good! 8) You're going to have to install a rope from the garage ceiling next to the driver's side so you can pull yourself out of it. :lol: :lol:

Jim
Image

User avatar
SASSY
Moderator
Posts: 5135
Joined: Sat Jan 07, 2006 12:32 am
Location: Wynndel, BC CANADA

Re: Lavron's '64 Build Thread

Post by SASSY »

Jims65cyclone wrote:Lookin' good! 8) You're going to have to install a rope from the garage ceiling next to the driver's side so you can pull yourself out of it. :lol: :lol:

Jim
Lavron "The Snake" comes to mind. Mike,maybe a vid of you slithering out of it at a show is in order,,, lol
Fred
Ps
I have been known to put my left hand on the ground crawlin outta mine
I'd rather do it myself if it's done right or not,,,isn't that what hotrodding is all about

Image

lavron
Site Admin
Posts: 4710
Joined: Sat Nov 01, 2003 9:17 am
Location: Missouri, Ozarks
Contact:

Re: Lavron's '64 Build Thread

Post by lavron »

Jims65cyclone wrote:You're going to have to install a rope from the garage ceiling next to the driver's side so you can pull yourself out of it.
SASSY wrote:Mike,maybe a vid of you slithering out of it at a show is in order
I am pretty limber for a big old guy :P I cheat and raise it up to get in and out and then reach in and let the air out :roll: :lol: actually not that hard getting in, you have gravity on your side.
poboyjo65 wrote:Its down right low! you're gonna need a skid plate,maybe one with little wheels! :lol:
Fred had already suggested a cow catcher air scoop :P on about page 4 or 5 :roll: It might get some kind of plate in front to protect the oil pan and keep dead possums from lodging themselves up on the cross member when I hit them on the highway :? (needs to mash them downward)
popscomet wrote:I think what you need IS curb feelers,,,fuzzy dice and twin spotlights and dingle berries hanging in the back glass,,,,then it will fit right in !! of course this is POP's personal opinion......keep up the good work !! pop
I think I am going for a more subtle look :lol:

So it is not so low if you look at the first picture at ride height and the rockers don't touch that 4x4 in the lowered picture :roll: Of course you would be lucky to stick a 2X under the front cross member when it is aired out (at ride height I can actually get the floor jack under the front crossmember)

I haven't got my replacement gauge tees yet but the air bags appear to be holding air, or at least most of it, car really hasn't moved down any in the last couple of days (been sitting at ride height in the shed) the air tank is loosing air, not super fast but I want it not to loose any. I ordered a new tubing cutter with the tees because I was having a little trouble getting good clean cuts with my current one, it would not even cut the 1/8" lines so I used a new razor blade to cut them so they may not be fully square, I also was not cutting the 3/8" line very well so I think my cutter was getting dull. I will just re-trim all the lines and check for fitting leaks with some soapy water.

Thanks for the compliments guys, I really like the car and how it is turning out but I am slightly biased :roll: I know it is just an old 202 2dr sedan 6 cylinder that is not in pristine condition, of course it has been slightly modified :P (or is being modified)

See Ya,
Mike
Mike's build thread
viewtopic.php?f=9&t=13058
Image

popscomet
Posts: 9689
Joined: Sat Jan 01, 2011 11:19 pm
Location: Jacksonville, Arkansas

Re: Lavron's '64 Build Thread

Post by popscomet »

mike,if your building this car to suit other people,,,,,,,,,,,,then your doing it all wrong !! it has to please ONLY YOU !!! that is the only way POP and son has ever looked at it....it's our way or no way !! or they can smooch a big hogg's hinny !!! pop
Image
pop/glenda

lavron
Site Admin
Posts: 4710
Joined: Sat Nov 01, 2003 9:17 am
Location: Missouri, Ozarks
Contact:

Re: Lavron's '64 Build Thread

Post by lavron »

popscomet wrote:mike,if your building this car to suit other people,,,,,,,,,,,,then your doing it all wrong !! it has to please ONLY YOU !!! that is the only way POP and son has ever looked at it....it's our way or no way !! or they can smooch a big hogg's hinny !!! pop
I agree! I think part of the way I look at this, or my attachment to the old Comet has to do with having it so long and certainly being my first car, I work on this car and think about being 17 and how cool it would have been back then to have been able to do this stuff (afford it) I am sure it would look different today if I had (1980s style) Parts would have been easier to find back then :P

I think the biggest thing that has changed for me through the years is originally I was careful not to change anything to detract from it's originality, after owning it 10 years I thought screw it, I want it how I want it this car is not some future investment and I am keeping it the rest of my life, time to address the running gear (most of it) so it got the engine redone (modified), the transmission replaced (I always hated the non-synchro first gear) and a nicer rear end, I never made it to rebuilding the front suspension or painting it instead I just drove it, fast forward 30 years and now is the time to get this car going again and taking some time to really go radical and repay some of my neglect and procrastination (other things were more pressing - marriage, house, work, etc) so anyone wondering why I am doing some of the stuff I am there is a partial answer :roll:

Rainy, stormy day today but I think I can get out in the shed and do a few things on the Comet.

See Ya,
Mike
Mike's build thread
viewtopic.php?f=9&t=13058
Image

Post Reply