Lavron's '64 Build Thread

The Era of The Square Body Racing Comets
User avatar
Jims65cyclone
Posts: 2764
Joined: Sun Nov 23, 2014 10:29 pm
Location: Lexington, SC

Re: Lavron's '64 Build Thread

Post by Jims65cyclone »

SASSY wrote:
Fri May 29, 2020 12:31 am
Need some 3/4 shots to get depth, I can't make out the unit in the pics cause of shadows.
Yeah, I'm having trouble understanding it, too. Looks to me like its sitting 90* out of phase with the original unit in both shots. :?

Jim
Image

lavron
Site Admin
Posts: 4710
Joined: Sat Nov 01, 2003 9:17 am
Location: Missouri, Ozarks
Contact:

Re: Lavron's '64 Build Thread

Post by lavron »

Jims65cyclone wrote:
Fri May 29, 2020 8:39 pm
Yeah, I'm having trouble understanding it, too. Looks to me like its sitting 90* out of phase with the original unit in both shots.
Nope, they are sitting the same, in the left picture on the Vintage Air unit the three-round things you see toward the left side are duct hookups coming out of the top on the unit, in the right picture the blower is where the fresh air door is on the original, maybe the confusion is because the two halves are different, the original there is a front and back and on the VA unit it has a top and bottom, also the stock heater is sitting crooked because it is resting on the blower motor.

It is not really clear but the little oval thing in the lower right picture is a VA logo. So anyway the two pictures are; left is looking down on the top, right is the inside what faces the cabin of the car (I wanted to say the front of the unit but it is really facing the back of the car :roll: )

Today I got the motor mounts modified so they are stronger (the engine mount halves, I already did the ones on the frame), I didn't take any pictures but I got them welded up, ground and painted.

I also cut the relief out on the transmission tunnel/console so the short-throw shifter would have a little more space around it, it was supposed to be a quick job, grab the plasma cutter cut out the section and weld a new plate back in, that was the plan but I didn't plan very well, plasma cutters melt air lines pretty easy if they are right below where you are cutting.

Image

They are 1/8" lines that run to the gauges, the first clue I messed up was the car slowing lowering down to the bump stops :roll: at that point, I remembered the lines were there :roll: no big deal, I had enough line to replace 3 of the 5 and there were a couple of half-lines long enough to reach temporarily, I will have to order some more.

After what I did today that addresses #4 on the list (except the rocker arm shaft);
#4 - Assemble the rocker arm shaft (it was taken apart for a thorough cleaning) At this point I need to do any alterations in the engine bay like cutting the exhaust pipes off shorter, I need to modify the transmission opening in the floor as well to give more shifter clearance on one side, I am also going to modify the motor mounts again by adding more reinforcement, I feel the metal is too thin on the sides.
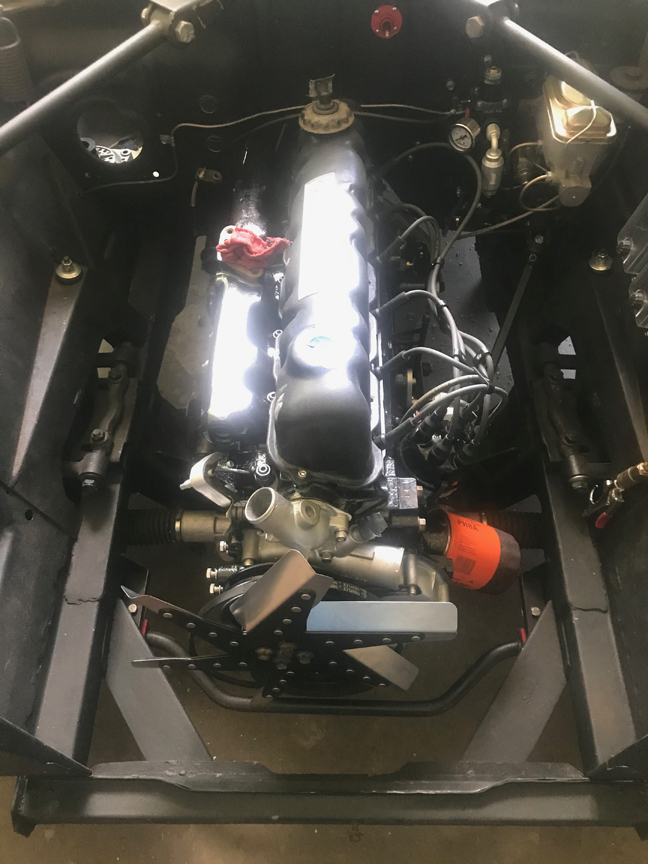
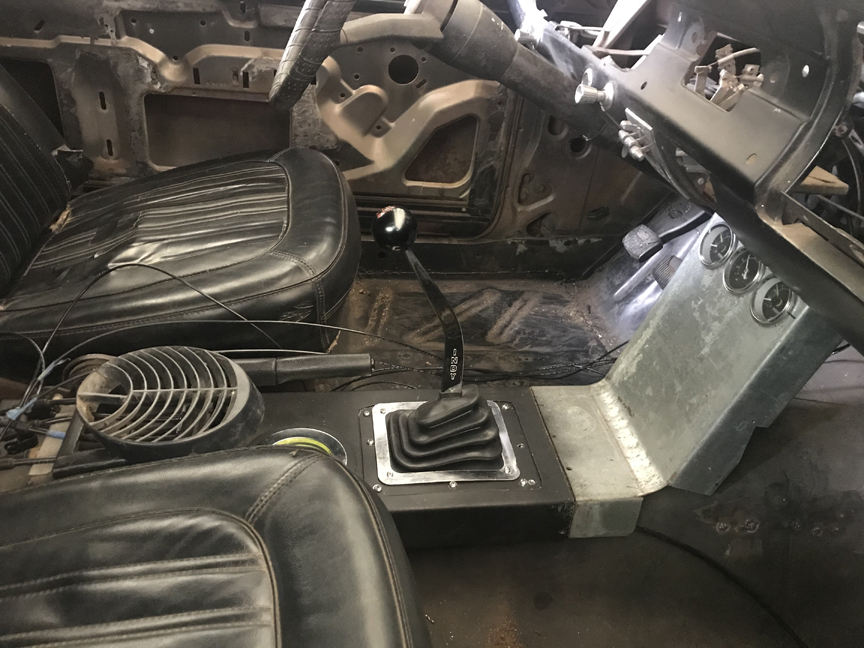
A lot of the list is going to clear rapidly because I am just bolting stuff together no fabrication required :P

See Ya,
Mike
Mike's build thread
viewtopic.php?f=9&t=13058
Image

lavron
Site Admin
Posts: 4710
Joined: Sat Nov 01, 2003 9:17 am
Location: Missouri, Ozarks
Contact:

Re: Lavron's '64 Build Thread

Post by lavron »

Ok it has been a few days because it was vacation time for my wife (usually would have been in PF) so I spent time with her instead of the Comet.

I got out this afternoon (worked on the trailer deck in the morning while it was shady and cooler) the shed is actually better after the sun gets up a bit more because the big open side in on the east and the sun cooks you in there, later in the day it is shady.

Got the motor plate, flywheel, clutch, pressure plate and transmission bolted on.

Image
Image

Found enough bolts that were right to get the motor plate bolted to the bell housing along the bottom, I had bought some for that a year ago and actually found them, for some reason I only bought two new ones and had one old one so I stuck it in the lowest hole behind the oil pan. I also stuck the starter on with some leftover studs I had from the header install, not sure I should put studs there but I did it anyway :roll:

For some reason I decided to torture myself and try to shove the motor in the car without fully prepping, like not moving my temporary work bench from in front of the car and not lifting the front of the car, the cherry picker will not go under the lower control arms unless the car is jacked up, it is harder to jack it up when you have the motor half installed BTW :roll: after sweating and grunting too long on it I finally called it a day and just sat the motor on a 2X block on the crossmember and ratchet strapped the transmission up so I could get the car shoved back forward because it is supposed to rain this week again.

I will try to get out tomorrow or so, raise up the car so I can fit under it and get the motor mounts installed and the transmission mount in there.

Hoping this is it for installing at least the short block and I won't have to pull it out again.

See Ya,
Mike
Mike's build thread
viewtopic.php?f=9&t=13058
Image

lavron
Site Admin
Posts: 4710
Joined: Sat Nov 01, 2003 9:17 am
Location: Missouri, Ozarks
Contact:

Re: Lavron's '64 Build Thread

Post by lavron »

Ok so I got back out this morning, still just like being in the tropics, finally this evening the wind started blowing cleared the humidity out and replaced it with a dirty haze, I guess :roll: supposed to be a cold front coming through and we might get storms, but all that did not stop me :P

I got the motor and transmission all bolted in and the driveshaft installed.

Image

I had to go to town today anyway so I stopped at the farm supply store and got some mostly stainless bolts for various brackets etc. I had to get some metric nuts to fit the trans mount, I wish I had figured out what they were before I put the the transmission in the car, I am not too good with metric bolts and I don't have much in stock, I dug through the junk drawer (I know you guys don't have one of those drawers that catches all the odds-n-ends that you never open to take stuff out of except as a last resort) I finally found one that fit after numerous trips under the cart testing different ones so I took it to town and bought two new locking type nuts that matched it.

I also have needed the big bolts for the motor mounts, I have several that fit but they are too short (not enough length for a nut to go on) so I have just been sticking them in there. It is a bite to install the motor mounts, everything has to be just right for all the bolts to go in, the big bolt is always a fight, today I just bought longer ones and ground a point on them so they worked like a punch, went in tons easier they just aren't very pretty.

Image

Looking at that picture I need to touch the paint up on top of that mount :P I skinned the bottom of the oil pan real bad too, I don't think I will fix it, it is galvanized under the paint anyway I think I did not prep it well enough on bottom so the paint doesn't stick the best anyway, the way I look at it it is going to be scarred up anyhow as close to the ground as it is.

After I got semi cleaned up I was sitting in the drivers seat day dreaming again when my wife texted me and wanted to know if I was going to come inside :roll: :oops: everything is set up so perfect for me, I guess it should be however :D

Anyhow on my 10 things list about half of it is finished;

#1 - Get intake adapter finished up and cast.
#2 - Install oil pump with gasket, and install the oil pan, finishing up the short block.
#3 - Install flywheel, clutch & PP.

#4 - Assemble the rocker arm shaft (it was taken apart for a thorough cleaning) At this point I need to do any alterations in the engine bay like cutting the exhaust pipes off shorter, I need to modify the transmission opening in the floor as well to give more shifter clearance on one side, I am also going to modify the motor mounts again by adding more reinforcement, I feel the metal is too thin on the sides.
#5 - Install transmission, starter, put lifters in, set the distributor timing. (at this point I may drop the motor back in the car for the last time, hopefully)
#6 - Fabricate the exhaust spacers and install them
along with the header, hook up the exhaust pipes.
#7 - Build and install the ignition system and the engine run harness. (the reason the motor needs back in)
#8 - Install driveshaft, fill the transmission.
Hopefully by this point, the intake is cast and ready to install, so...
#9 - Install intake adapter, carbs, fuel lines, and linkage after putting the head, pushrods, rocker arms, and valve cover on the engine.
#10 - Fill motor with break-in oil and pre-lube, install radiator and fill with water, add some gas to the tank.

See Ya,
Mike
Mike's build thread
viewtopic.php?f=9&t=13058
Image

lavron
Site Admin
Posts: 4710
Joined: Sat Nov 01, 2003 9:17 am
Location: Missouri, Ozarks
Contact:

Re: Lavron's '64 Build Thread

Post by lavron »

Check #8 off the list, I got the trans filled today also got the hydraulic clutch hooked up, filled, and bled, what everyone says about bleeding hydraulic clutches is true, I filled the master, pumped the pedal a couple of times and then went under and opened the bleeder, nothing, I went back up and pumped the pedal again, checked and the master was almost dry, filled it some more and watched the fluid draining down, got under the car and looked at the stream of fluid dripping on the floor, closed the bleeder and filled the master the rest of the way, capped it and I had pedal feel.

Got my wife to get in the car and push the pedal while I watched the clutch arm, it moved forward to the correct position and then back where it belonged so I am thinking it should be fine. I had forgotten I had marked the clutch fork travel on the bell housing, I was reviewing my build thread last night and saw that I had, makes me happy :D

I also got the speedometer gear changed on the cable, lubed the cable and stuck it in the hole in the trans and threaded up into the cabin, now I am going to have to find that grommet KevinS was talking about :roll: :P I do need to do a little routing on the speedo cable and maybe add a mount loop or two to it and the clutch line.

Final thing I did was remove the exhaust spacers and cut the other gasket up and then temp bolted the header back on.

Not feeling too good today, I worked out in the heat for two days and this morning it felt really chilly out, I wasn't going to waste a nice day, came in the house tonight with 101 fever so I might not do anything tomorrow depending on how I feel.

Anyhow the car is coming together it will stop, pause, turn, and go up and down, now to get the GO pedal to work :roll: when I lowered the car down this evening I put it on dollies so I can scoot it over and do some serious cleaning, especially the big spot of brake fluid and trans fluid I spilled.

See Ya,
Mike
Mike's build thread
viewtopic.php?f=9&t=13058
Image

lavron
Site Admin
Posts: 4710
Joined: Sat Nov 01, 2003 9:17 am
Location: Missouri, Ozarks
Contact:

Re: Lavron's '64 Build Thread

Post by lavron »

Now that most of a week was wasted to being sick (to add insult to injury it was nice weather) I got out today and did a little work, my wife suggested I quit early and not over do it, and of course it is back to being hot and humid.

I did get out and start doing a little cleaning and organizing, not a full bore cleaning but just a little bit, I can hardly walk around out there right now and I spend way too much time looking for stuff, right now I can't find my last two bolts that hold the shifter on, no idea what I did with them but I am sure if I clean enough I will find them in one of the lower layers of stuff piled around. I at least got the floor cleaned up and all the bigger tools moved out of the way (had to take over my wife's parking spot for a day or two) now I can at least walk all the way around the car. I am going to attempt to clean one bench off so I can put the drill press in a semi permanent home, I am sure it won't stay clean long.

I had an unexpected delivery today, late last week I had ordered some stuff from C&G Ford Parts, they showed up today, if you all can remember all the way back to maybe page 118 of this thread I was complaining about not finding the trunk bumpers;
I really need the two trunk bumpers but have been able to find them yet, so for now I cleaned them and painted them with Plasti-Dip, don't even know if the paint will stay on them but they look slightly better but they are still dry and cracked.
Image
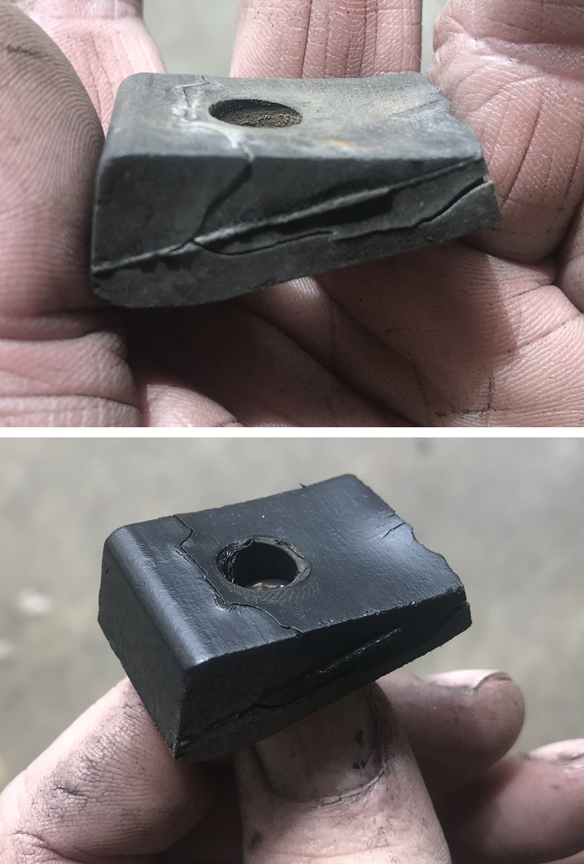
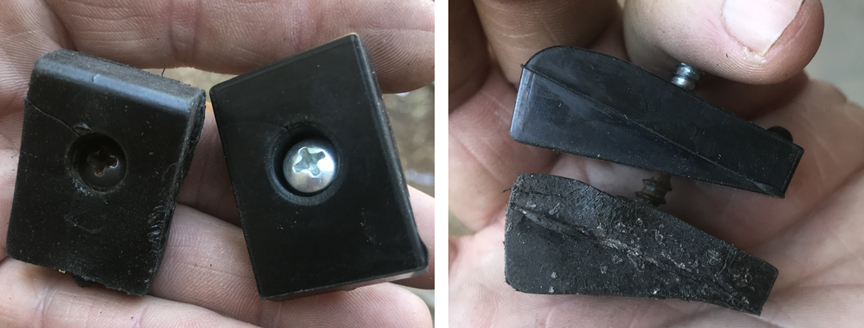
C&G had them for $10 a pair so I ordered some, they came today and I got them installed, they don't exactly look like the ones that came off but I think they are correct and mine are just so bad and deformed that is what mine are supposed to look like.
Image

I also ordered a replacement door handle mechanism for the drivers side, I had said something a long time ago (not even going to look back for that post) when I dismantled the doors I found a broken spring in the bottom, even though the handle works fine I am sure it would rattle really bad, I never noticed it before but the whole car rattled and it might not so much now :P they also had Mercury key blanks so I bought some plus a couple of other things, this is what happens when you are stuck inside sick and want to work on your Comet :roll: :lol:

I did a couple of other things today but won't bore you guys with it but I do have one question; Anyone know where to get speedometer overlays for a '64 Comet? I still want black with white letters, my extra "zero miles" speedometer has some glue or something on the face of it and I know when I clean it off I am going to clean off some of the numbers.

See Ya,
Mike
Mike's build thread
viewtopic.php?f=9&t=13058
Image

lavron
Site Admin
Posts: 4710
Joined: Sat Nov 01, 2003 9:17 am
Location: Missouri, Ozarks
Contact:

Re: Lavron's '64 Build Thread

Post by lavron »

Chipping away at it, I have been trying to get some stuff put away so as I go if I can bolt it on the Comet I will, so not putting it away but putting it on :roll:

Some things just fight you, something that should be simple turns into a challenge just to get it done, so it was with the shifter boot and cover over the shifter base, I kept breaking drill bits, holes were falling where I could not drill, like the outside corner or in welds, I even thought I would use some new drill/tap combo bits and snapped the bit off in the very first hole where I couldn't even retrieve it. in the end I got it installed.

Image

There is actually some kind of trim/cover going over the top of the console so I may have to replace the outside screws with something that sits flush.

I have the alternator installed (except wiring) I painted the bracket and bolted it on with stainless bolts, one thing that was a surprise for me is I had to install the alternator from underneath, I guess it is no big deal the space should always be there and it goes in easy you just have to lay on your back to get it there :roll:

Image

Still not sure on the AC compressor looks like that is not going to fit easy.

Radiator is in, still need to find a lower hose, but it is looking more and more like a complete engine bay.

Image

The big thing is for now the fenders are cleaned off and don't have things piled all over them and you can still walk all the way around the car.

See Ya,
Mike
Mike's build thread
viewtopic.php?f=9&t=13058
Image

User avatar
Jims65cyclone
Posts: 2764
Joined: Sun Nov 23, 2014 10:29 pm
Location: Lexington, SC

Re: Lavron's '64 Build Thread

Post by Jims65cyclone »

What's the status on getting your intake manifold cast? Or are you just going to stick with the wooden one? :P

Jim
Image

lavron
Site Admin
Posts: 4710
Joined: Sat Nov 01, 2003 9:17 am
Location: Missouri, Ozarks
Contact:

Re: Lavron's '64 Build Thread

Post by lavron »

Jims65cyclone wrote:
Thu Jun 18, 2020 8:00 pm
What's the status on getting your intake manifold cast? Or are you just going to stick with the wooden one? :P

Jim
It's coming I just need to stop procrastinating on it, there is so much to do it seems like that I never quite get to it, I think what slows me down on it is there is a lot to do prior too, like getting the flasks built and coming up with several 100? pounds of greensand, etc. obviously the day will come soon that I have to work on it.

Don't think I am not all in and excited about doing it, it is kinda like the roll-over jigs, I had the materials for months before I just one day went out and built them, then it seemed to take forever to actually turn the car up but one I did I went to town on it and got her done.

I am purposely not starting on my wiring until I get going on the intake because I have no idea how long it will take for my friend to help me, at that point if I am waiting I will do wiring etc.

See Ya,
Mike
Mike's build thread
viewtopic.php?f=9&t=13058
Image

lavron
Site Admin
Posts: 4710
Joined: Sat Nov 01, 2003 9:17 am
Location: Missouri, Ozarks
Contact:

Re: Lavron's '64 Build Thread

Post by lavron »

Going to make a slight change of plans, not going to change my final outcome just change my checklist slightly.

I just ordered a clone YFA 1 barrel carburetor to put on my car, right now the head/intake has not been altered except for grinding the top of it but the mounting flange is unaltered.

My plans are to put the 1 barrel on the car and get it running, break-in the motor/cam properly. I have mulling this over and decided the easiest way to maybe get the car to start the first time is to have it set up in a semi stock form, all the cam break-in calls for is 10 minutes at 2400 RPM, cool down and another 10 minutes at 2400 RPM, I would also like to take that opportunity to get all the fluids circulating the trans and rear etc and maybe take that maiden voyage around the yard :roll:

The carb was less than $70 and I am supposed to get it next week so in the mean time I need to get going on the wiring/ignition system.

I don't know if this is a good plan or a bad plan but it is at least a plan, let me know if you think this a bad idea :roll:

See Ya,
Mike
Mike's build thread
viewtopic.php?f=9&t=13058
Image

popscomet
Posts: 9689
Joined: Sat Jan 01, 2011 11:19 pm
Location: Jacksonville, Arkansas

Re: Lavron's '64 Build Thread

Post by popscomet »

I think it is a good plan,,one carb to mess with at 1st,,less head ache....be sure you have break in oil added....pop
Image
pop/glenda

User avatar
Jims65cyclone
Posts: 2764
Joined: Sun Nov 23, 2014 10:29 pm
Location: Lexington, SC

Re: Lavron's '64 Build Thread

Post by Jims65cyclone »

I think it's a great idea. That was in the back of my mind when I asked about the status of the manifold. Like Pop said, one carb to deal with while getting a new engine started and broken in. Setting up the 3X2 carbs could get involved on it's own.

Jim
Image

User avatar
SASSY
Moderator
Posts: 5135
Joined: Sat Jan 07, 2006 12:32 am
Location: Wynndel, BC CANADA

Re: Lavron's '64 Build Thread

Post by SASSY »

Great idea!
Looking forward to seeing it move under its own power.
Hey, maybe you could get ma to hold the camera and you could do donuts around her in the yard, like k block does??
Just a thought,,, :mrgreen:
Fred
I'd rather do it myself if it's done right or not,,,isn't that what hotrodding is all about

Image

lavron
Site Admin
Posts: 4710
Joined: Sat Nov 01, 2003 9:17 am
Location: Missouri, Ozarks
Contact:

Re: Lavron's '64 Build Thread

Post by lavron »

Thanks guys I think everyone agrees to I need to limit possible points of failure on the first start, I should have thought about this sooner but sometimes there are a lot of other things to work through and it gets pushed back.

I started wiring in earnest today, or I tried too, and discovered I had not stocked up on supplies and tools to do the job very well and had to make an order, I was going to do some Weather Pack connectors and discovered I had never purchased a tool only the connectors :roll: so that will take a few days to get here. In the mean time I took my fuse box off the fender and added some bus bars inside it and a couple of large constant connection relays, one for the "ignition on" and the other for the "accessory bank" so when the key gets turned on the ignition on side of one of the fuse boxes (5 circuits) are activated through the relay, the other relay is triggered by "ACC" switch to activate 10 circuits (1 box) there will probably never be 10 accessories but I guess that doesn't matter. The final 5 circuits are always hot and connected directly to the battery. Some of this won't get hooked up right away but I wanted to get the relays in place etc.

The ignition wiring for the ICM and distributor is nearly complete and run to position, I only lack the hook up to the distributor because that is where the weather pack connector is going. I made my custom coil wires so now the coil wire runs from the distributor to under the dash where the coil will be.

I will take some pictures when I get a little further along and have something to actually show, my next little project is to build the coil/ICM mount.

See Ya,
Mike
Mike's build thread
viewtopic.php?f=9&t=13058
Image

lavron
Site Admin
Posts: 4710
Joined: Sat Nov 01, 2003 9:17 am
Location: Missouri, Ozarks
Contact:

Re: Lavron's '64 Build Thread

Post by lavron »

Got the starter relay mounted and wired up, I decided the factory part would be the best to use in case of failure on the road, it mounts right where the starter solenoid originally was on the inner fender and uses the original holes.

Image

The big wire coming through the grommet on the fender is the battery cable it runs to a bulkhead fitting in the firewall and then back to the battery in the back of the car someplace (well it isn't there yet) I am still waiting for the bulkhead fitting to arrive. The small red wire that is jacketed with the battery cable runs to the ignition switch start wire (or to the clutch safety switch and then to the start switch. the big wire running down goes to the starter as does the brown small wire.

What happens is where you turn the key to start position it energizes the red wire that causes the relay to close supplying power to the brown wire that is connected to the starter solenoid on top of the starter that causes the drive on the starter to engage and supplies power to the starter motor through the big wire, hopefully starting the car :P

The alternator is all wired up as well except the big 6 gauge wire that runs to the starter hot lug (big wire coming down from the relay) that will charge the battery. There is also one wire left on the alternator (you can see the little red plug in the picture above, lower left corner) it goes to the ignition run side of the switch (hot when car is running) not sure what it's purpose is but I know where to hook it up :roll:

So almost finished with the wiring on the right side of the motor.

Still waiting on a few supplies to completely finish (plus some I probably haven't even ordered because I don't know I need them) will keep working at the wiring lots to do.

See Ya,
Mike
Mike's build thread
viewtopic.php?f=9&t=13058
Image

Post Reply